Hack The Box – Sunday

Please note: This post was first released on September 29, 2018 on my old blog at: https://offensive-it.blogspot.com/2018/09/hack-box-sunday.html

This box retired on 29th of September 2018
Goal: CTF – user.txt & root.txt
Difficulty: 4.1 / 10 (rated by HTB-community)

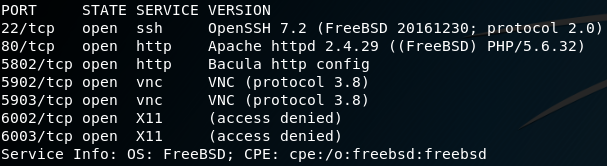
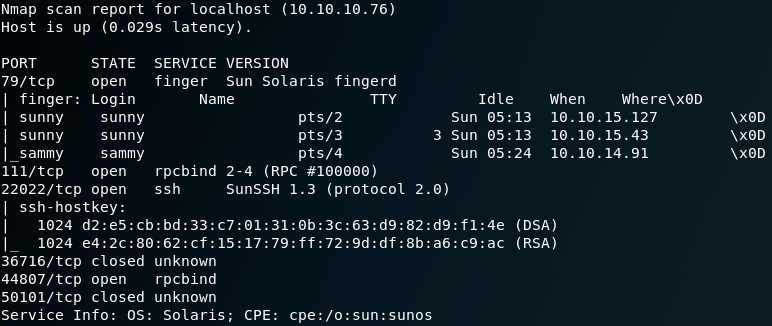
We start with a Nmap scan and use the parameter “-p-” to scan the entire (tcp) port range. As figure 1 shows the box offers a ssh service on port 22022. We could use this information to start a password spraying attack, but to do so we need to know any valid usernames first. Another service that is running on the box is finger, which is a user information lookup program. As shown in figure 1 Nmap already obtained two valid usernames for the box by using finger.

1. Nmap scan result

For each of the two usernames “sunny” and “sammy” we start a password spraying attack with THC-Hydra. With the right password list we gain a hit after some minutes for the user sunny as shown in figure 2.

2. Hydra password spraying

After connecting to the box via ssh as the user sunny we search for the user flag. Typically these flags are inside the “/home” directory of a user. But we wont find any flag inside the home directory for the user sunny. Since we already know about a second user we look inside the “/home” directory for the user sammy. Inside this directory we find the “user.txt” flag, but unfortunately we are not able to access the file. To do so we need to escalate our privileges or access the machine as user sammy.

While doing the standard system enumeration and search for a valid privilege escalation technique we find an entry for the sudo command as shown in figure 3.

3. Sudo options for user sunny

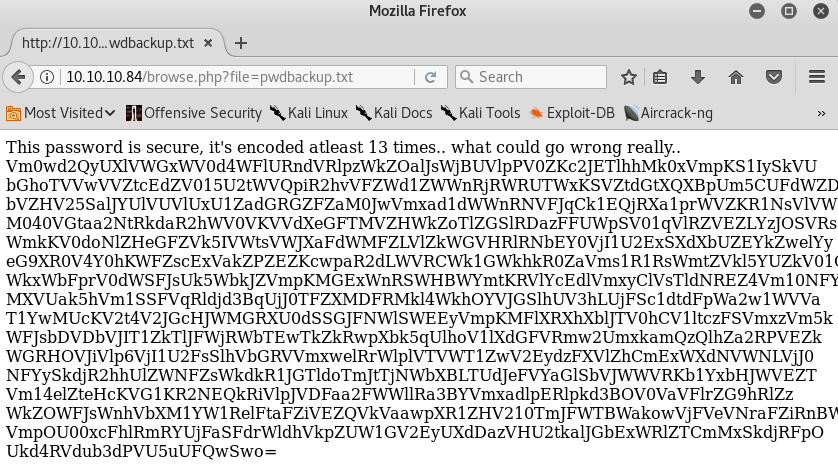
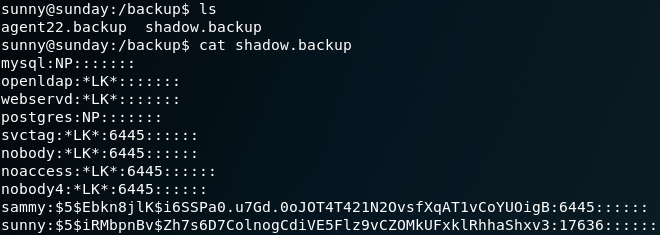
Since it says “troll” we will ignore it for now, while keeping this in mind because it might come in handy later. After some more enumeration we find a backup directory. Inside that directory is a file called “shadow.backup” which contains some password hashes as shown in figure 4.

4. Backup of shadow

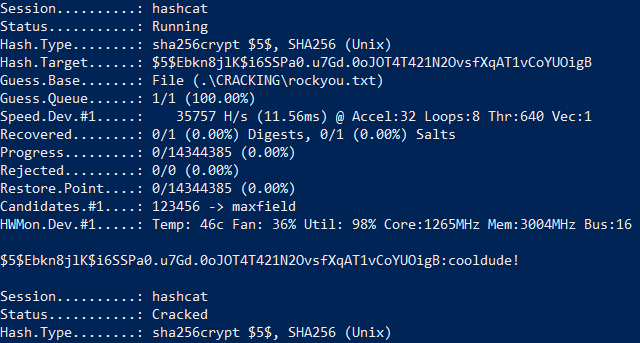
We copy the password hash for the user sammy and use hashcat to perform a dictionary attack to gain the cleartext password as shown in figure 5.

5. Using hashcat to recover the password for user sammy
6. Accessing the user flag

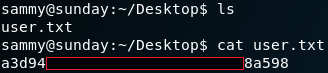
With the new obtained password we switch to the user sammy on the box, which grants us access to the user flag. The next step is to gain root privileges. To do so we once more start with the enumeration of the system. While checking for privileges on using sudo we notice that for user sammy there is no “troll”  entry anymore but instead a “NOPASSWD” for “wget” as shown in figure 7.

7. Sudo options for user sammy

With this in mind we take a look at the manual for wget and find an entry for the “–post-file=file option. With this option we can use POST as the method for all HTTP requests and send the data inside the request body. We can use this option to send the contents of the root flag to our local attacking machine while using netcat to listen for the incoming data as shown in figure 8.

8. Obtaining the root flag

At this point we could have also gained a root shell by using wget to send any ssh keys or to manipulate the passwd file on the box. Another interesting file to copy from the box is the shadow file which contains the hash for the password of user root. But sadly, after copying the hash I was not able to recover the password with hashcat and ended up with multiple failed dictionary attacks.

9. Getting root hash

Hack The Box – Poison

Please note: This post was first released on September 08, 2018 on my old blog at: https://offensive-it.blogspot.com/2018/09/hack-box-poison.html

This box retired on 8th of September 2018
Goal: CTF – user.txt & root.txt
Difficulty: 3.9/10 (rated by HTB-community)

As always when attacking a system we start by gathering information about the box. To do so we use Nmap to scan for open ports and find a web- and ssh- and some other service as shown in Figure 1.

1. Results of Nmap scan

Before we get in touch with the ssh service we open up a browser and go to the web service. Figure 2 shows that the website allows to load different pages, while a subset of the available pages (init.php, info.php etc.) are listed on the website itself.

2. Poison – Website
3. Listfiles.php

We open every site to look for interesting information. The last page that is being listed is “listfiles.php“, which shows all other previous mentioned sited plus an “pwdbackup.txt” file as shown in figure 3. When we inspect the URL of the website we see a key-value pair that is being passed as parameter to the web server. With the parameter “?file=” the web server knows which resource the user has requested. Which is why we edit the value of the parameter to “?file=pwdbackup.txt” as shown in figure 4. By doing so the web server loads a text file which seems to be some kind of base64 encoded password.

4. Pwdbackup.txt
5. Decoded password

Furthermore there is an information message that states that the password is encoded at least 13 times. We copy the encoded password to our local machine and by decoding it 13 times in a row we receive the password as shown in figure 5. Since the web service itself does not have any kind of login feature the password might belong to a user of the underlying system.  Now that we already obtained a password we need to know which user this password belongs to. For this we head back to the web service and try to get a list of all users that have access to the box. Since we already know an interface between the web service and locally stored files we might try to exploit it to display the local passwd file. To do so we use a local file inclusion on the “?file” parameter as shown in figure 6.

6. Local File Inclusion to display passwd

Looking closely at the contents of passwd we will find a user called charix. If we try to connect to the box via ssh with the user charix and the password that we obtained by decoding the base64 string we will get access to the box. Inside the “/home” directory of user charix we will find the user flag and a secret.zip file.

7. Contents of /home for user charix

We copy the “secret.zip” file with “scp” to our local machine and try to unzip it. By doing so we need to insert a password to get access to the zipped file. When we enter the same password which we already obtained for the user charix the file gets successfully unzipped and we see a secret file with non human readable content.

The next step is to obtain the root flag and to do so we need to do a privilege escalation. After some enumeration of the system and its running services we identify with the command “ps aux” that the user root is running an instance of xvnc. Furthermore, we can see that the host is listening on port 5901 for incoming vnc connections as shown in figure 8.

8. Listening ports on Poison

But we cannot simply connect to the xvnc because of two problems. The first problem is that the system itself does not have vncviewer installed and therefore we cannot connect locally on the vnc service. The second problem is that although we have vncviewer on our local attacker machine, port 5901 is not open for remote usage otherwise we would have detected it with our Nmap scan from figure 1. Because of this we have to use local port forwarding to connect to the listening vnc service. Normally local port forwarding via SSH lets you connect from your local machine to another server with the help of an ssh server. But it is also possible that the destination server can even be the same as the ssh server which is the case we are facing in this situation. Because of this we use the command as shown in figure 9 to forward the port 5901 from our local machine to port 5901 on the victim box.

9. Local port forwarding for port 5901

The next step is to use the port forwarding to connect to the listening vnc service from our attacking machine. To do so we can use vncviewer on our localhost on port 5901. But as figure 9 shows, we need to authenticate our self to access the vnc session. Unfortunately we don’t own any password that would grant us the access to the vnc session. But we already obtained a file called secret, which we can use with the parameter “-passwd” for authentication. By doing so we are granted access to the vnc session and the desktop of the user root.

10. Using the previously obtained secret file & port forwarding to access vnc

Once we used the command from figure 10 tightvnc opens up and we have access to a root session on the box. With this we have full access on the system and are able to access the second flag.

11. Access as root & flag